Deploy Your App with Ratio1’s Worker App Runner - No CI/CD Required
For CSPs
Education

Deploying AI applications on a decentralized network doesn’t have to be complicated. Ratio1’s new Worker App Runner lets you launch apps straight from your GitHub repository - no CI/CD pipelines, no Docker builds, and no server setup needed[1][2]. This tutorial will walk you through two easy ways to use the Worker App Runner to deploy an application from source code to the edge in minutes, using only your Git repo URL. We’ll cover:
Method 1: SDK Deployment - using the Ratio1 Python SDK in a few lines of code. (Requires developer access and node whitelist.)
Method 2: Deeploy UI Deployment - a no-code, step-by-step process using the Ratio1 Deeploy web app with screenshots. (Requires CSP access with an Oracle node.)
Along the way, we’ll highlight prerequisites, explain each step in plain English, and show how Ratio1’s platform handles the heavy lifting (building, containerization, and even auto-redeploy on new commits) behind the scenes. By the end, you’ll see how to get your app running on Ratio1’s decentralized network with zero infrastructure hassle - just push your code and go!
Prerequisites
Before we dive in, make sure you have the following in place:
A Ratio1 Edge Node (Mainnet, Devnet or Testnet) available to run your app.
Ratio1 SDK installed (for Method 1). You can install it with pip (pip install ratio1_sdk --upgrade). Ensure your SDK client is whitelisted on the node you’ll use - i.e. the node must allow your SDK’s address to submit jobs. (On a self-hosted node, run r1ctl config show to get your SDK client address, then add it to the node’s allowed list using the add_allowed <address> command[4].)
Deeploy App access (for Method 2). You’ll need to log into the Deeploy web app with your CSP account. Make sure you have a crypto wallet (MetaMask, for example) connected with sufficient USDC for deployment costs, since Deeploy will escrow funds for the job.
A GitHub repository containing the application you want to deploy. This can be a public repo or a private one (if private, have a Personal Access Token ready for clone access). The repo should include any build scripts or configuration needed to run the app. In our example, we’ll deploy a simple web application (a React app) from a GitHub repo.
(Optional) Cloudflare Tunnel credentials if your app is a web service you’d like to expose externally. The Worker App Runner can automatically set up a Cloudflare tunnel to give your app a public URL. We’ll show where to input a Cloudflare Tunnel token - it’s not required, but without it the app will only be reachable within the node’s network.
Note: This tutorial uses Ratio1 Devnet for demonstration (all screenshots are from Devnet). The process is similar on other networks, but Devnet is ideal for testing. Now, let’s get started!
Method 1: Deploy via Python SDK (Programmatic Approach)
If you prefer coding or want to automate deployments, the Ratio1 Python SDK provides a simple interface to launch a Worker App Runner job. This method is great for developers iterating on apps, as it allows integration with your development workflow. We’ll use a short Python script to deploy our app directly from a GitHub repo.
How it works: The SDK will instruct a Ratio1 node to launch a Worker App Runner job with your repo info and commands. The node will automatically: clone your repository, run your build steps, start the app inside a container, and monitor the repo for any new commits (re-deploying the app when changes are detected). All of this happens on the edge node without you manually building or pushing any container image - truly “git push to deploy”![5][6]
SDK Deployment Script
Below is an example deployment script (https://github.com/Ratio1/ratio1_sdk/blob/main/tutorials/ex23_deploy_worker_app.py) from the Ratio1 SDK tutorials which demonstrates launching a Worker App Runner job. This script requires that your SDK is connected to a Ratio1 node and that the node has whitelisted your client address. Update the placeholders (GitHub repo info, etc.) to your own project, then run the script to deploy:
Let’s break down what this code is doing:
Connect to the Ratio1 network: The script creates a Session object, which establishes a connection to the Ratio1 node (using your local SDK configuration). We use silent=False so we can see some logs. Be sure the my_node variable is set to the address of the node you want to deploy on (here it’s a placeholder "0xai_..." string). Remember, this node must trust our SDK client (hence the whitelist requirement mentioned earlier).
Cloudflare Tunnel (optional): The script prompts for a Cloudflare tunnel token. If you provide one, the Worker App Runner will use it to expose your app on a public URL via Cloudflare. If you hit Enter without a token, the app will still run, but without an external URL (you’d only be able to access it if connected to the node’s network).
Specify the Git repository (VCS data): In the vcs_data dictionary, we fill in details of our GitHub repo. In this example, it’s set to a repository (my-super-react-app) under a certain user. You should replace "USERNAME", "REPO_OWNER", "REPO_NAME", and possibly the "BRANCH" with your repo’s info. If your repo is private, you’d also supply a "TOKEN" (a GitHub PAT) so the node can clone it. Currently, GitHub is the supported provider[7].
Set resource requirements: We define container_resources like CPU (1 core), memory (512MB), and no GPU for this app. These ensure the node allocates sufficient resources. We could also specify ports here (e.g., open port 3000) if our app needed it - our example leaves the ports commented out for now, except we will expose port 4173 later when creating the app.
Define build and run commands: In build_and_run_commands, we list the shell commands the Worker App Runner should execute inside the container to build and start our app. Here it’s a Node.js project, so we do npm install, then npm run build, then npm run serve. (This assumes the repo has appropriate npm scripts; you could put any commands needed for your app, like installing Python dependencies and running a Python script, etc.)[8]. These commands will be run sequentially inside the container.
(Optional) Set environment variables or volumes: We prepare an env dict with any environment variables our app needs (here we set NODE_ENV: "production" as an example). We can also define volume mounts if needed (the example shows how to mount a host directory or define file volumes, but they’re empty by default)[9]. For simplicity, our app doesn’t require additional volumes or files.
Create and deploy the Worker Web App: The core of the script is the call to session.create_worker_web_app(...)[10][11]. Here we pass all the parameters:
node - the target node address.
name - a name for this app/job (simply for identification).
tunnel_engine="cloudflare" and the cloudflare_token we got (to enable a web tunnel).
The vcs_data (repo info), image="node:22" (base Docker image to use - Node.js 18/20 LTS in this case), and our build_and_run_commands.
cr_data (container registry credentials) we leave as default (using Docker Hub public, no credentials needed here).
env and resource limits, plus port=4173 (the internal port our app listens on; 4173 is used by the Vite dev server in this example app).
vcs_poll_interval=60 - this tells the runner to check the Git repo every 60 seconds for new commits[12]. If it sees a new commit on the specified branch, it will automatically pull the changes and restart the app! 🎉 This is how continuous deployment is achieved with zero CI/CD config.
The create_worker_web_app call returns an app object, which we then immediately deploy with app.deploy(). This triggers the job on the node.
8. Confirmation and monitoring: If deployment succeeds, the script prints out some messages confirming that the worker webapp was deployed and summarizing its behavior (clone, monitor, expose via tunnel). The session.wait(...) at the end simply keeps the script alive for 5 minutes so you can observe the app running (and then it will close the session and stop the job). In a real scenario, you might not shut down the session like this - we do it here because it’s a tutorial script. The main point is that once app.deploy() is called, the job is running on the node and will keep running until stopped, even if your SDK session disconnects (unless you intentionally set it to close).
After running this script (and providing your Cloudflare token if you chose to), check your Ratio1 node’s dashboard or logs. You should see that a new WORKER_APP_RUNNER job started, pulled your code, and launched the app. If you provided a tunnel token, you’ll also get a public URL (often logged to console or obtainable via app.url if the SDK returns it). You can open that URL in a browser to view your running application. 🎉
Tip: The Worker App Runner job will continue to poll your GitHub repo. Try making a change (commit & push) on the specified branch - within ~60 seconds, the app will auto-rebuild and apply the update. No manual deploy steps needed! This built-in re-deploy feature makes development and continuous delivery a breeze, as the platform acts like your CI/CD pipeline[13]. If needed, you can adjust the vcs_poll_interval (e.g., for faster or slower checks) or even trigger manual redeploys via the SDK if you disable auto-polling.
Method 2: Deploy via Deeploy UI (No-Code Click-Through)
Next, let’s look at how a CSP can deploy the same application through the Deeploy web UI. This method requires no coding - instead, you’ll use Ratio1’s dashboard to configure and launch the Worker App Runner job. It’s ideal for those who prefer a visual interface or are deploying for clients via the CSP portal. We’ll go through the entire flow with screenshots from the Devnet environment, from creating a project to seeing the app live.
Assumptions: You are logged into the Deeploy App with your CSP account (Devnet in our case), and you have at least one Oracle node available to run the job. Also, your wallet (MetaMask) is connected for signing transactions and has enough USDC to cover the deployment cost. The UI will guide us through creating a project, configuring a Worker App job with our GitHub repo, and funding the deployment.
Let’s get started with the UI steps:
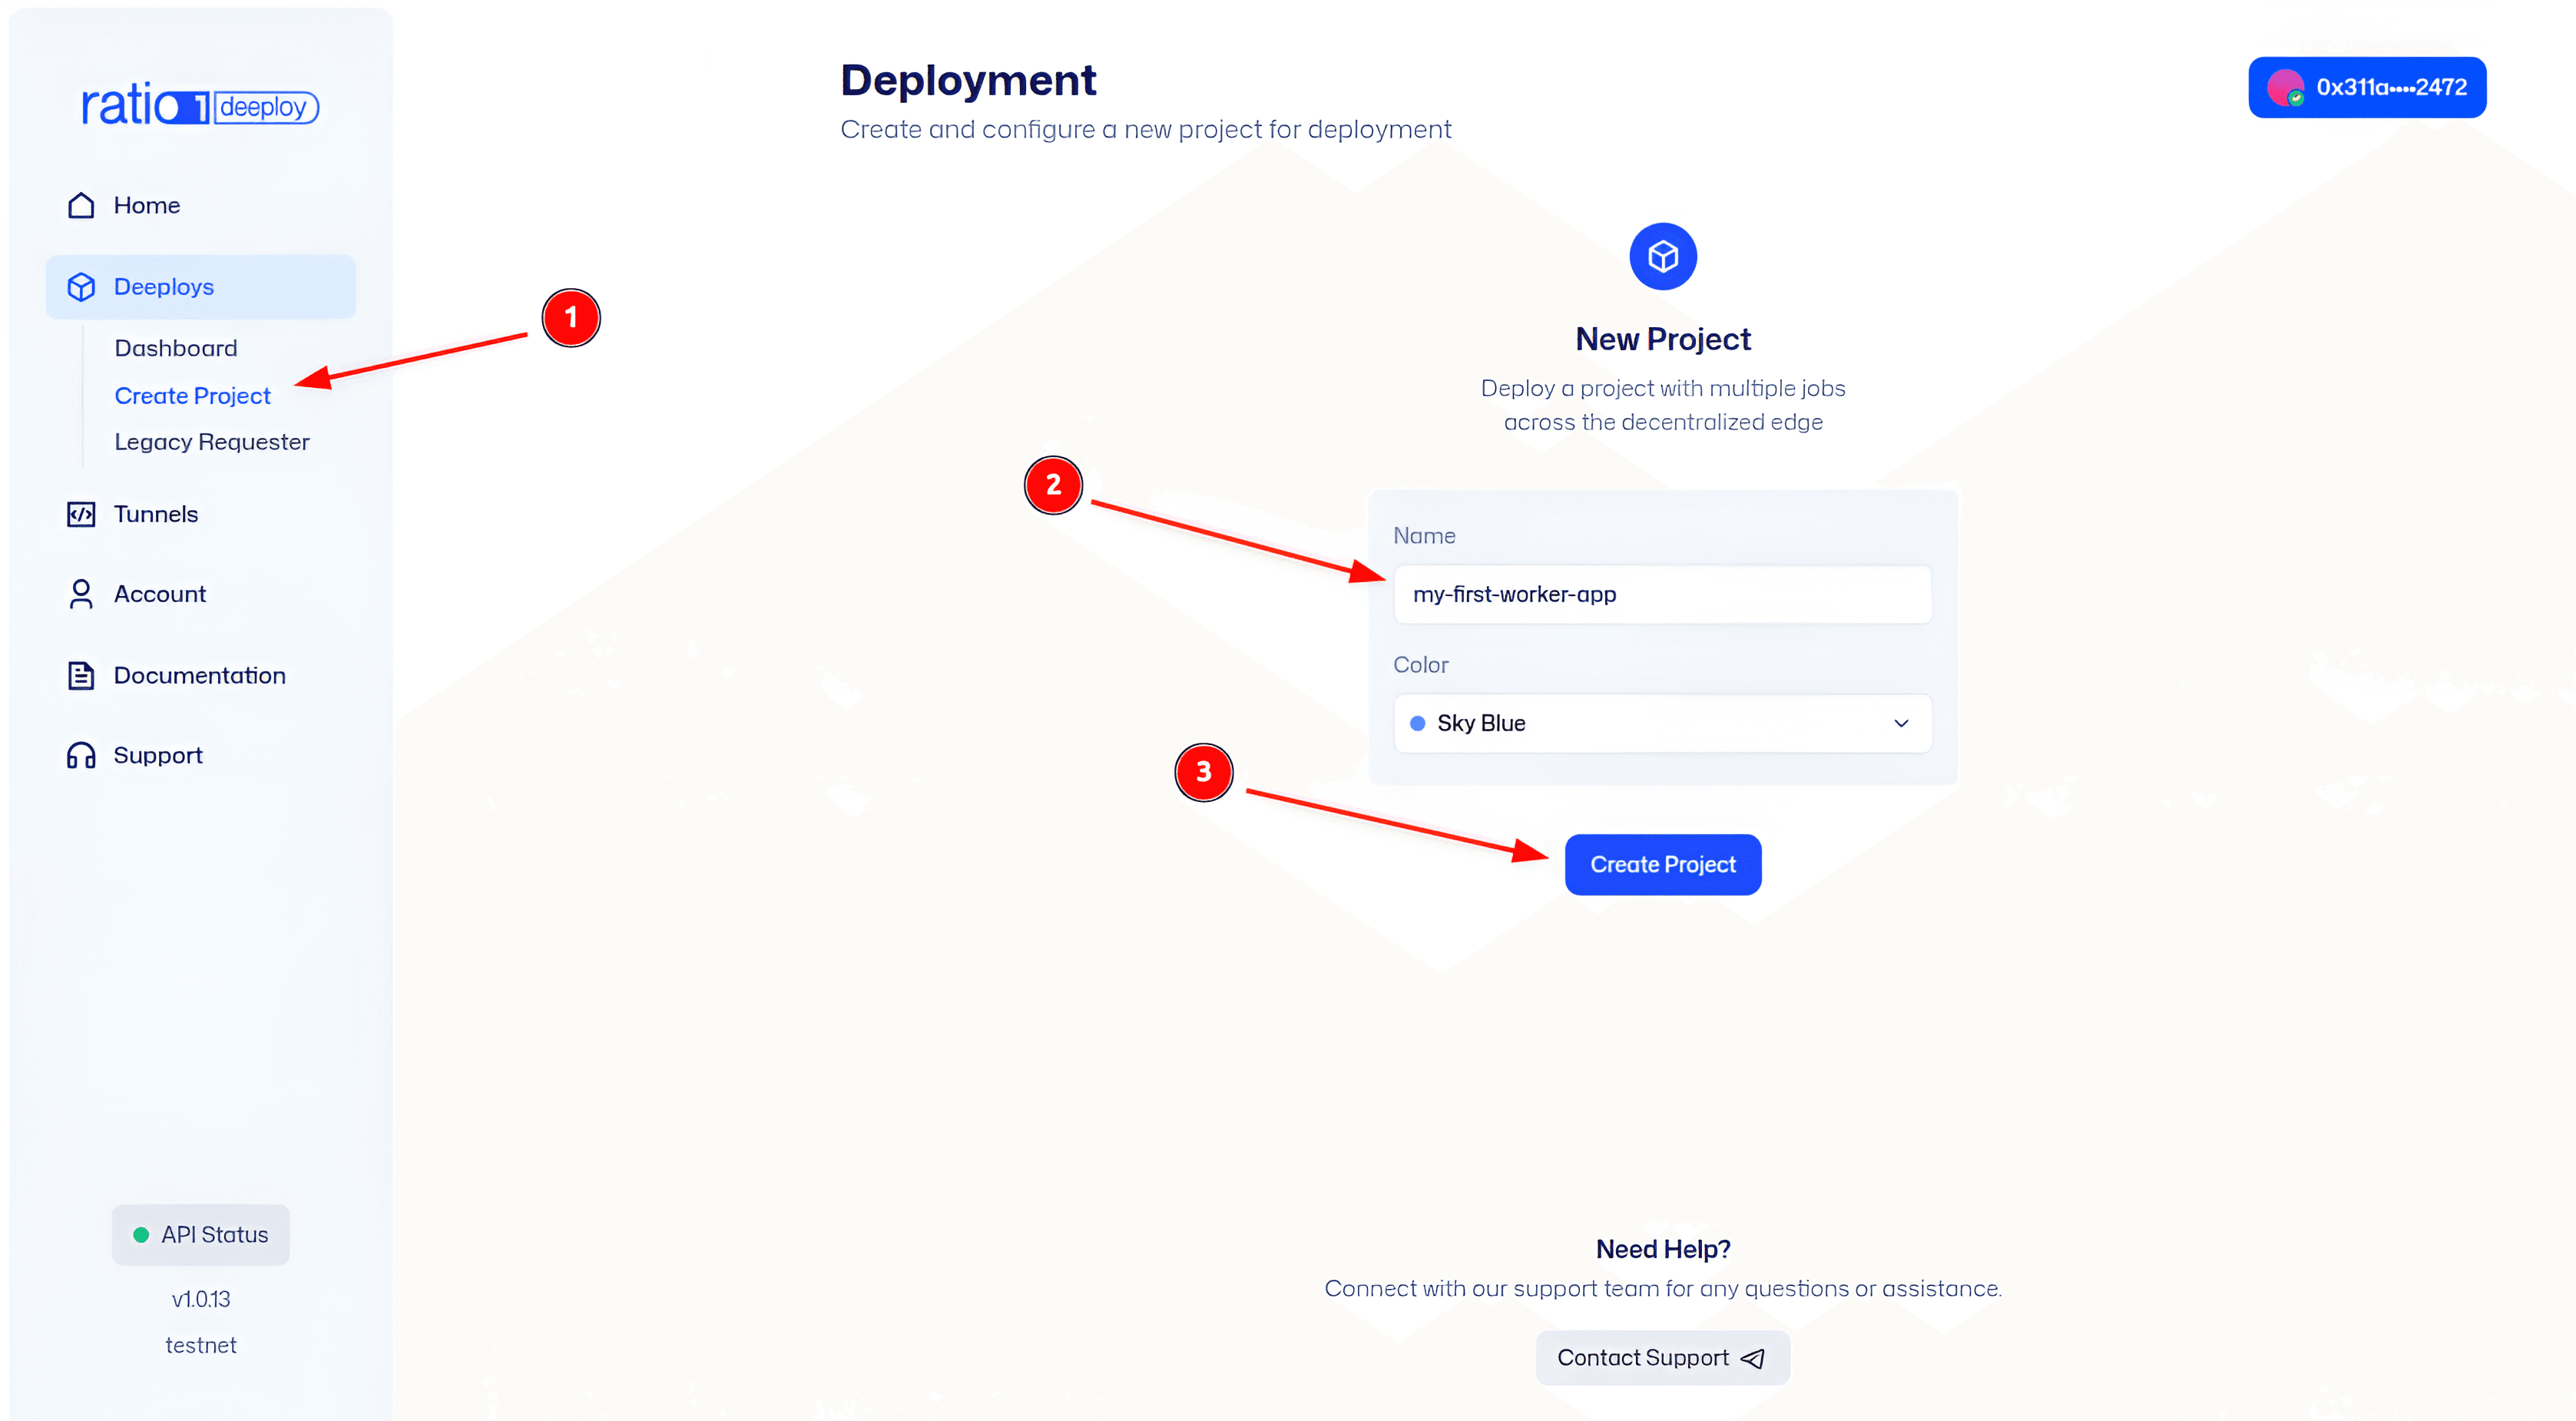
Figure 01 (Devnet): Creating a new project in the Deeploy UI. In the Deeploy dashboard, start by clicking “Create Project”. Projects are like folders for your deployments - each project can contain one or more jobs (applications or services you want to run). Give your project a descriptive name (for example, the name of the app or the client), as this will help you organize deployments later. After filling in the project details, confirm to create the project.
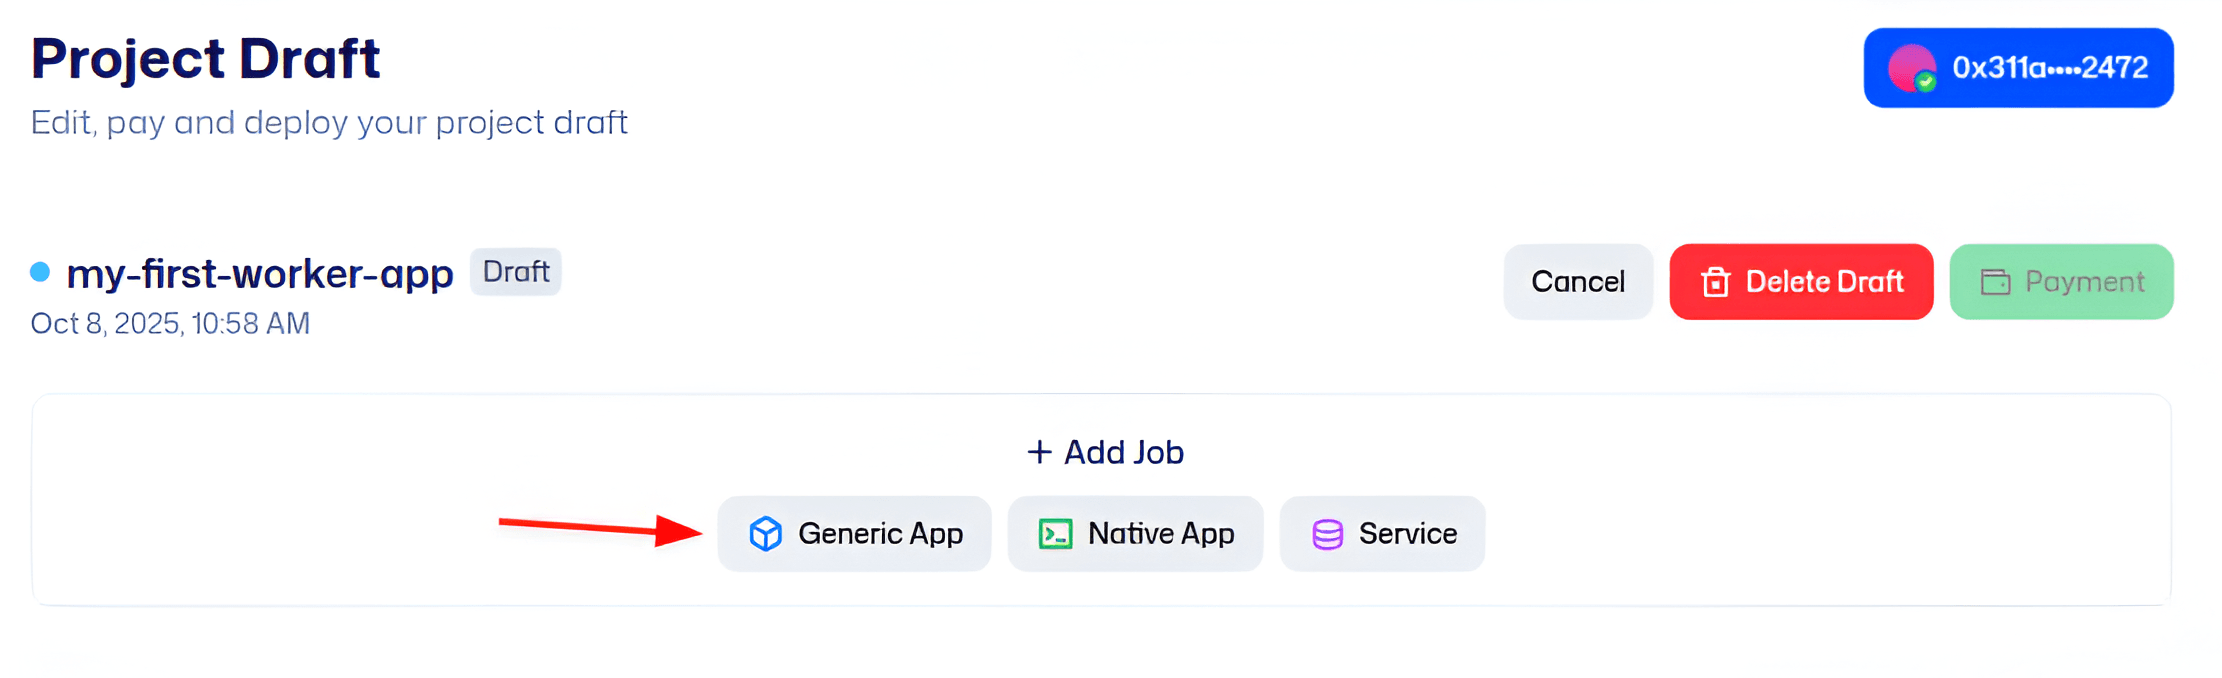
Figure 02 (Devnet): Adding a Generic App job to the project. Once the project is created, you’ll be taken to the project page. Here, click on “Add Job” (or a similar “+ Add” button) and choose the Generic App template. The Generic App job type is a flexible template for running arbitrary applications. It allows you to deploy either by providing a pre-built container image or by using the Worker App Runner for source code. In our case, we’ll use the Worker App Runner path (deploy from Git), which is what makes it a “generic” app not tied to a pre-made image.
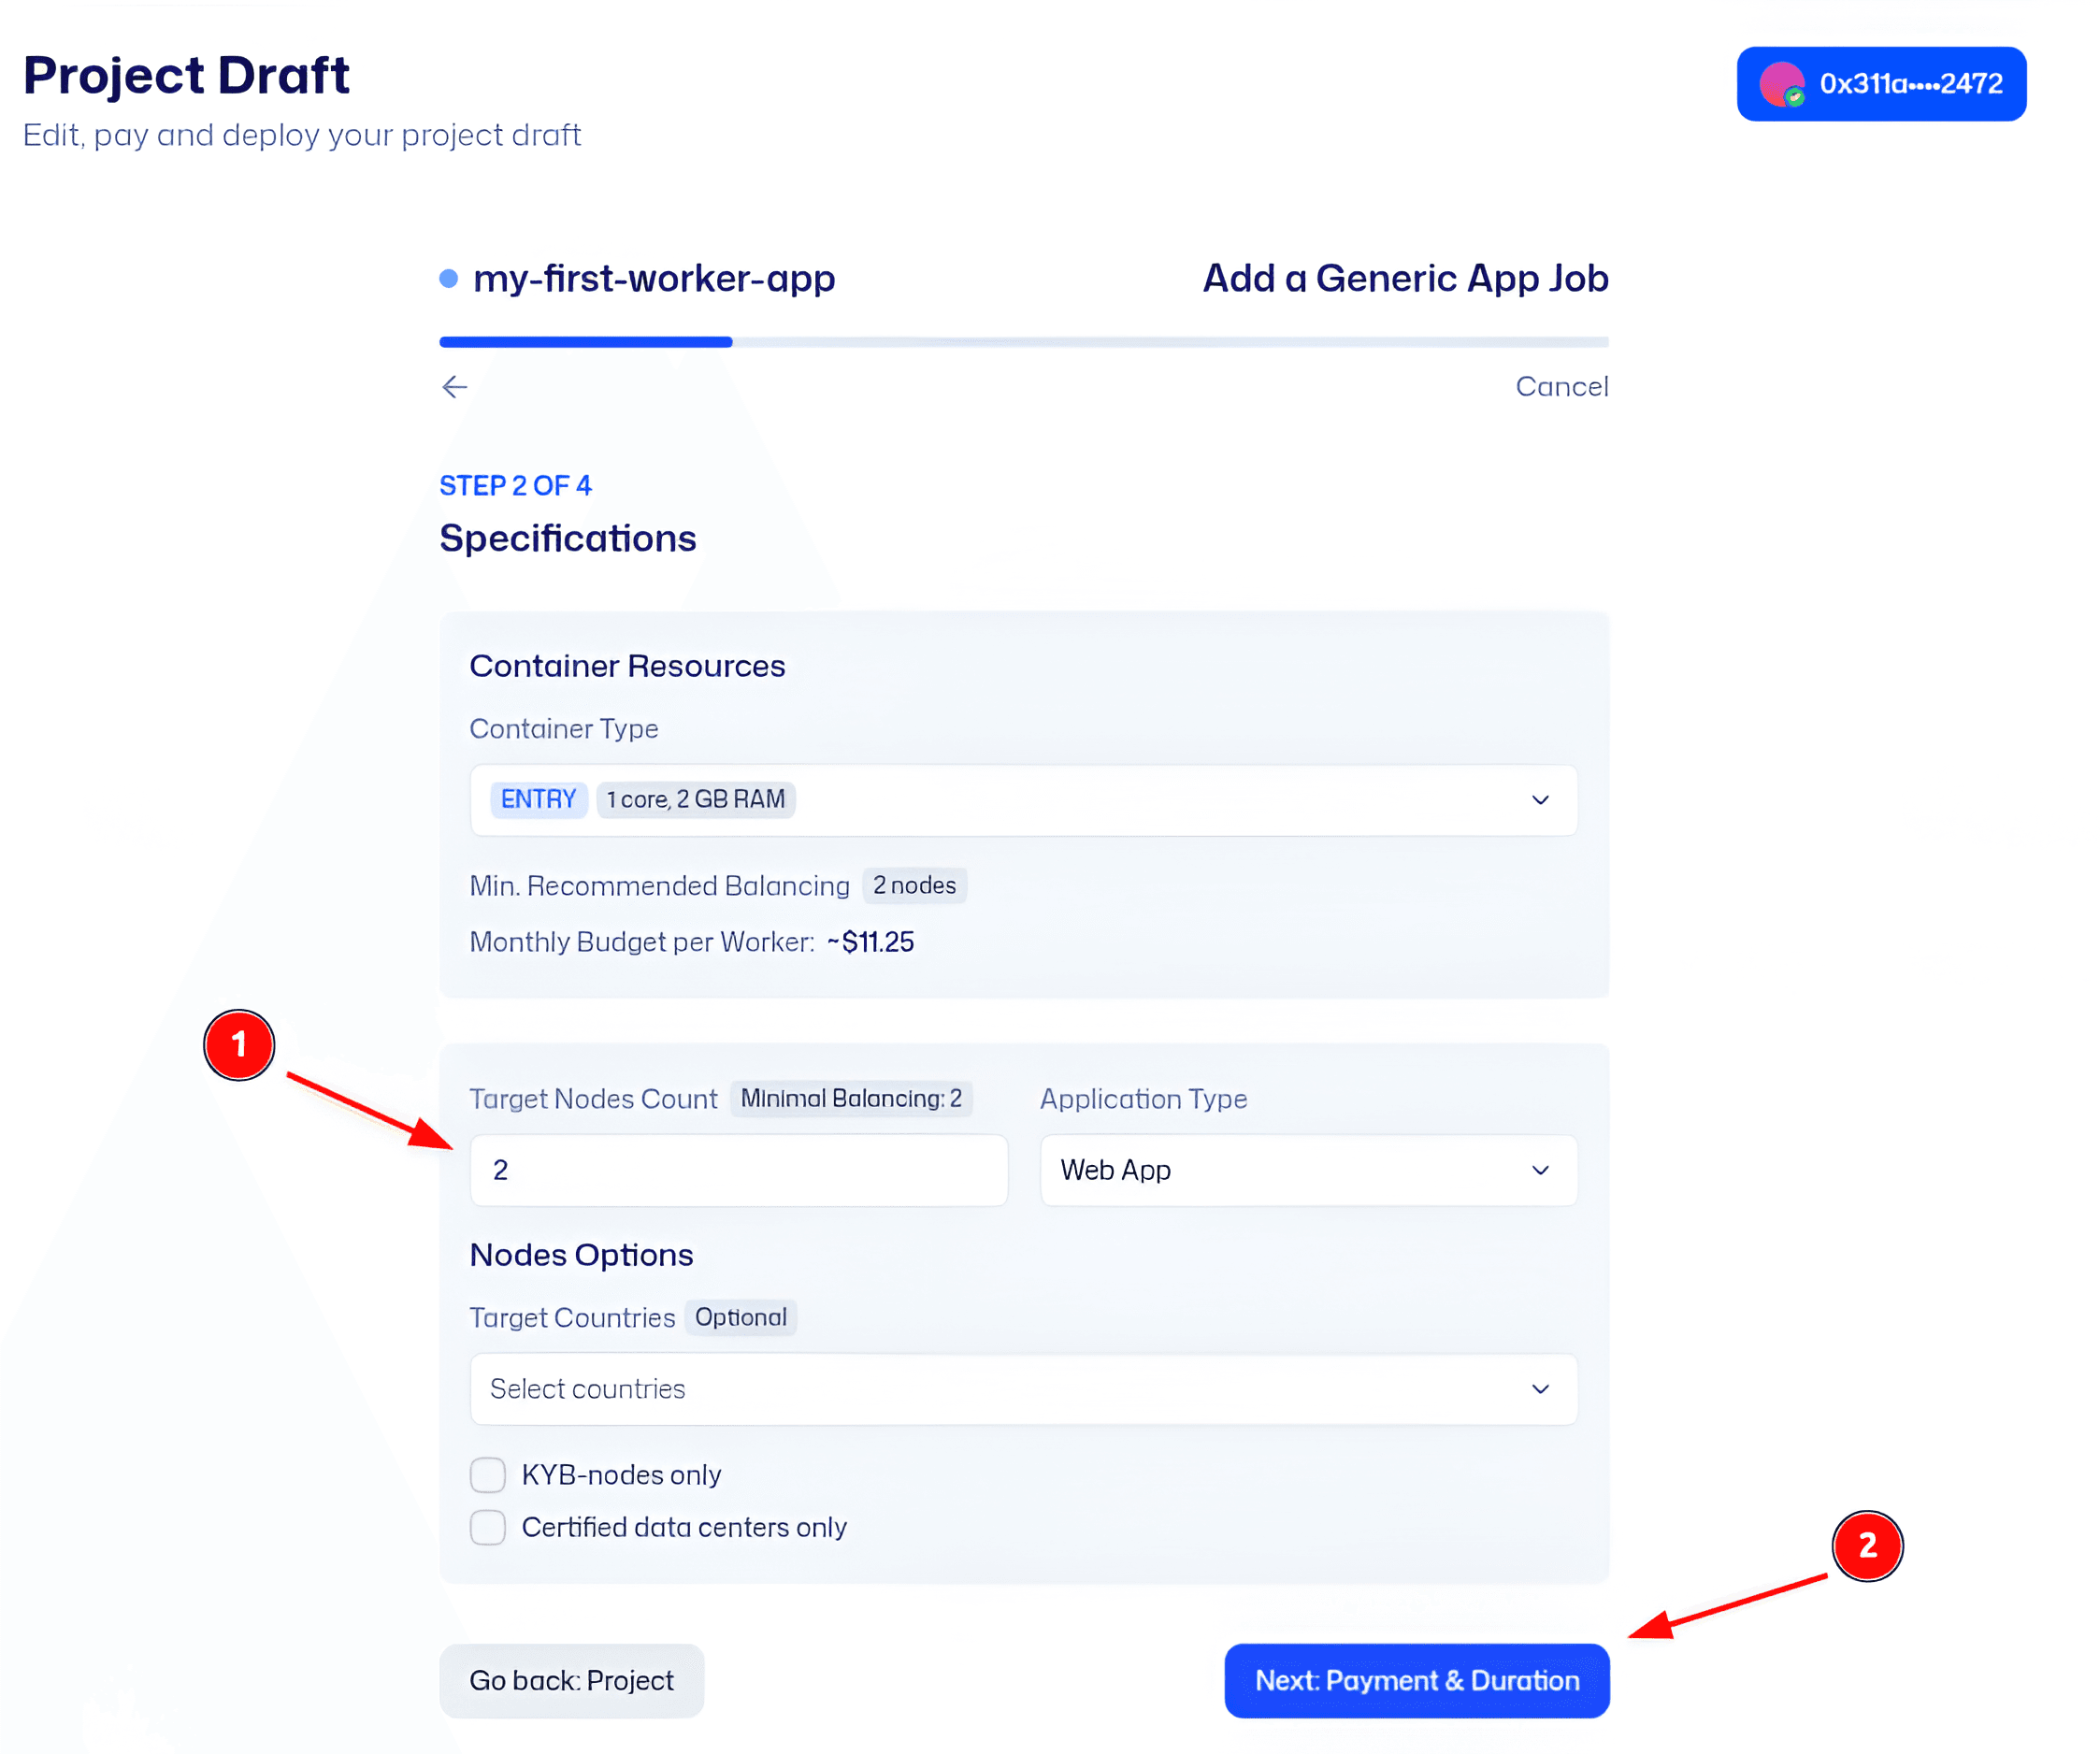
Figure 03 (Devnet): Specifying resources and app type for the new job. After selecting Generic App, you’ll need to enter the resource requirements and type of application. In this screen, configure how much CPU, memory, and how many nodes you want for your app. For example, you might choose 1 CPU, 0 GPUs, 512 MB RAM, on 1 node (since our app is lightweight). Also, ensure the App Type or mode is set to use the Worker App Runner (there may be a toggle or selection for “Deploy from Source (Worker)” vs “Deploy from Image”). This tells the platform that you will provide source code instead of a container image. Setting the correct resources is important to ensure your app has enough power to run; the UI will show an estimate of cost based on these specs.
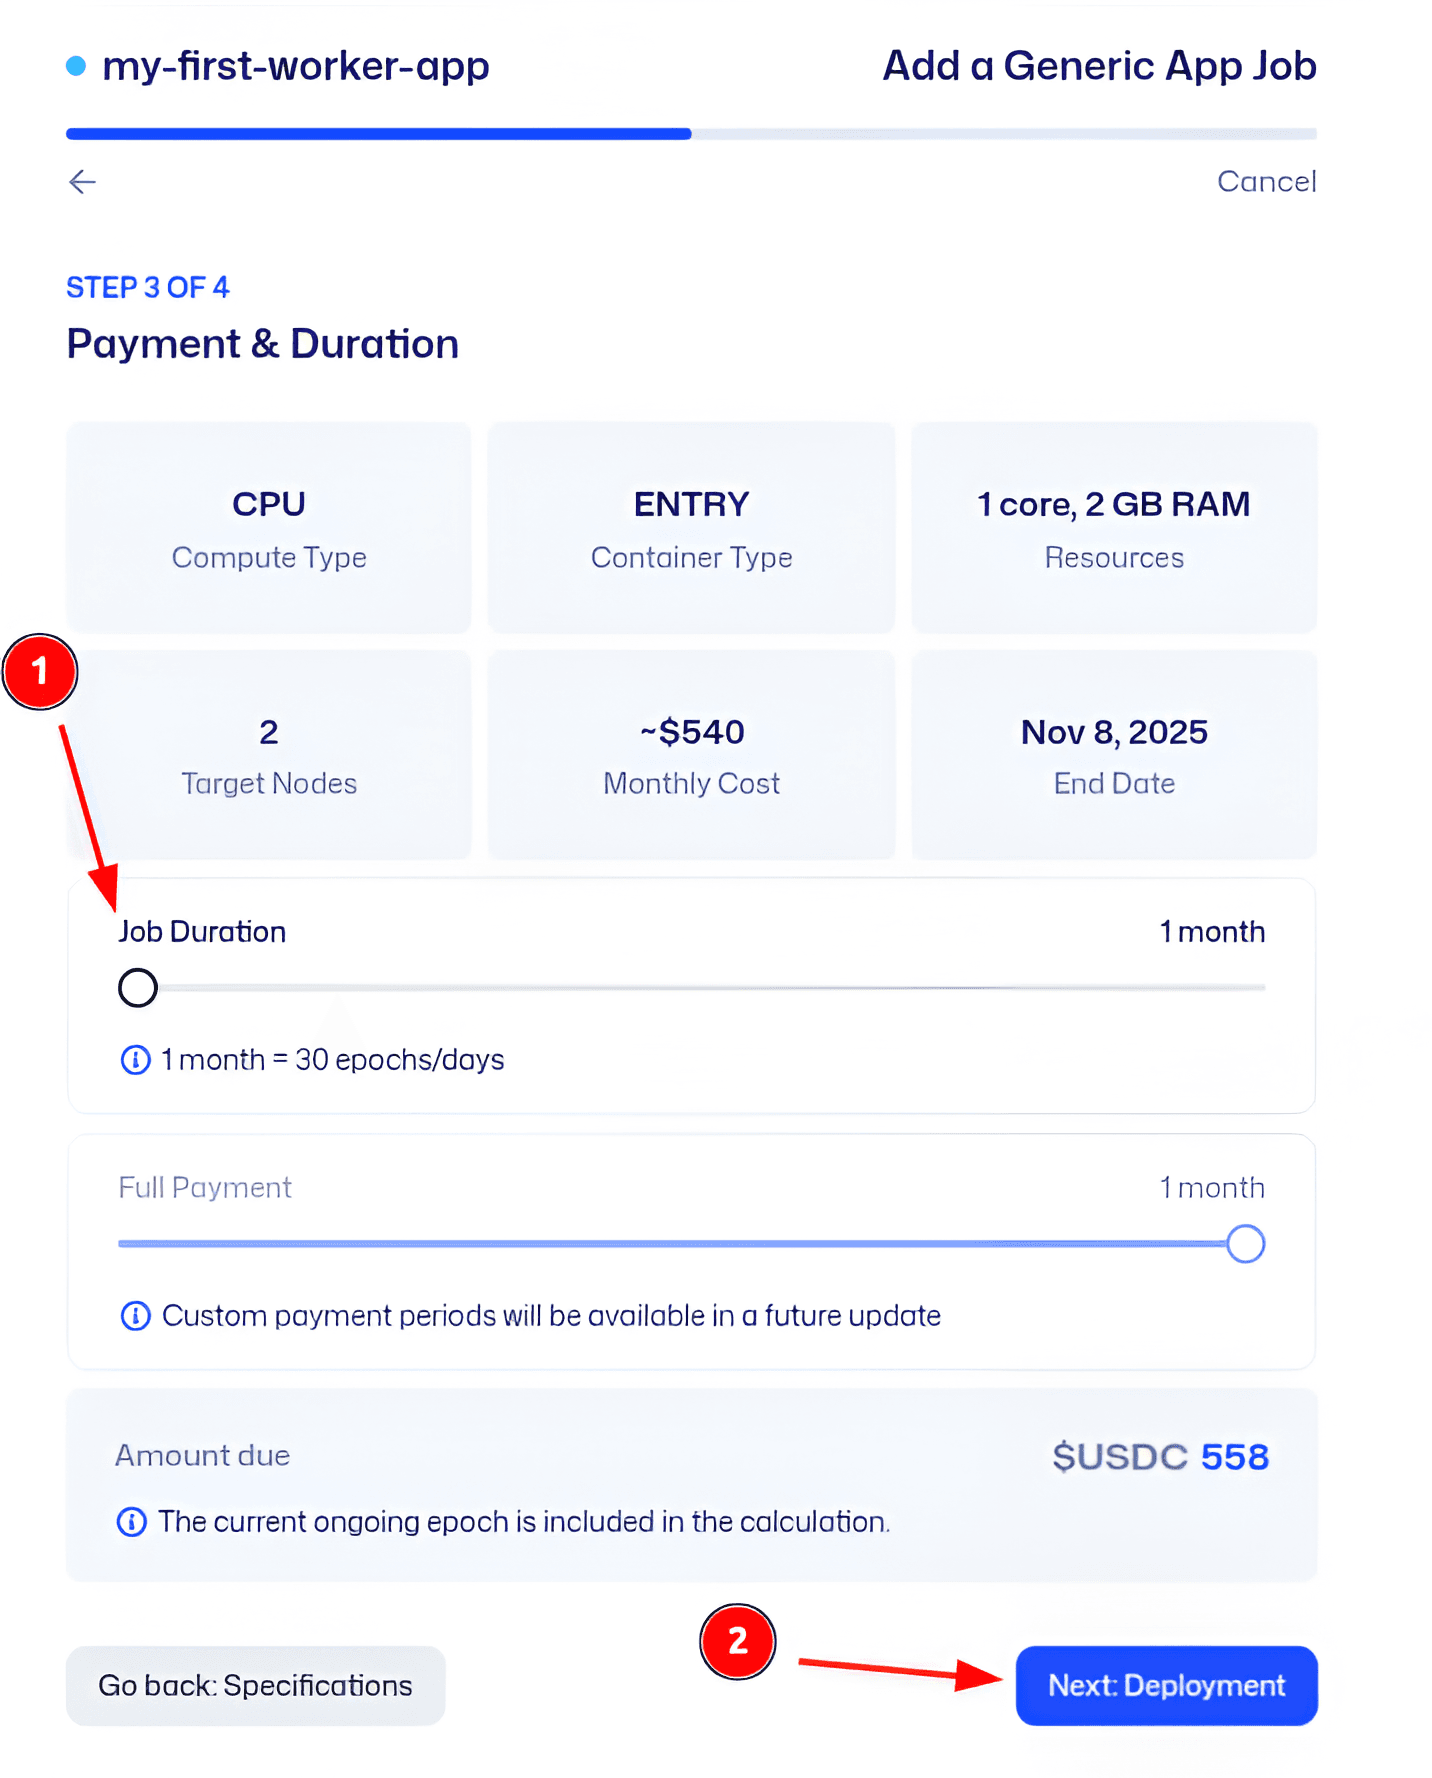
Figure 04 (Devnet): Setting the job duration and reviewing cost estimates. Next, specify how long you want the job to run (the duration or timeout). For example, you might set it to run for a few epochs, or choose an option for an ongoing service with a certain billing cycle. In Devnet, we might set a short duration just for testing. The Deeploy UI will calculate the cost for the chosen duration and resource combination - here you can review the estimated USDC cost for running your app on the selected node(s) for that time. This step is crucial for budgeting: it ensures you’re aware of how much you’ll lock up in the escrow contract for the deployment. If everything looks good, proceed to the next step.
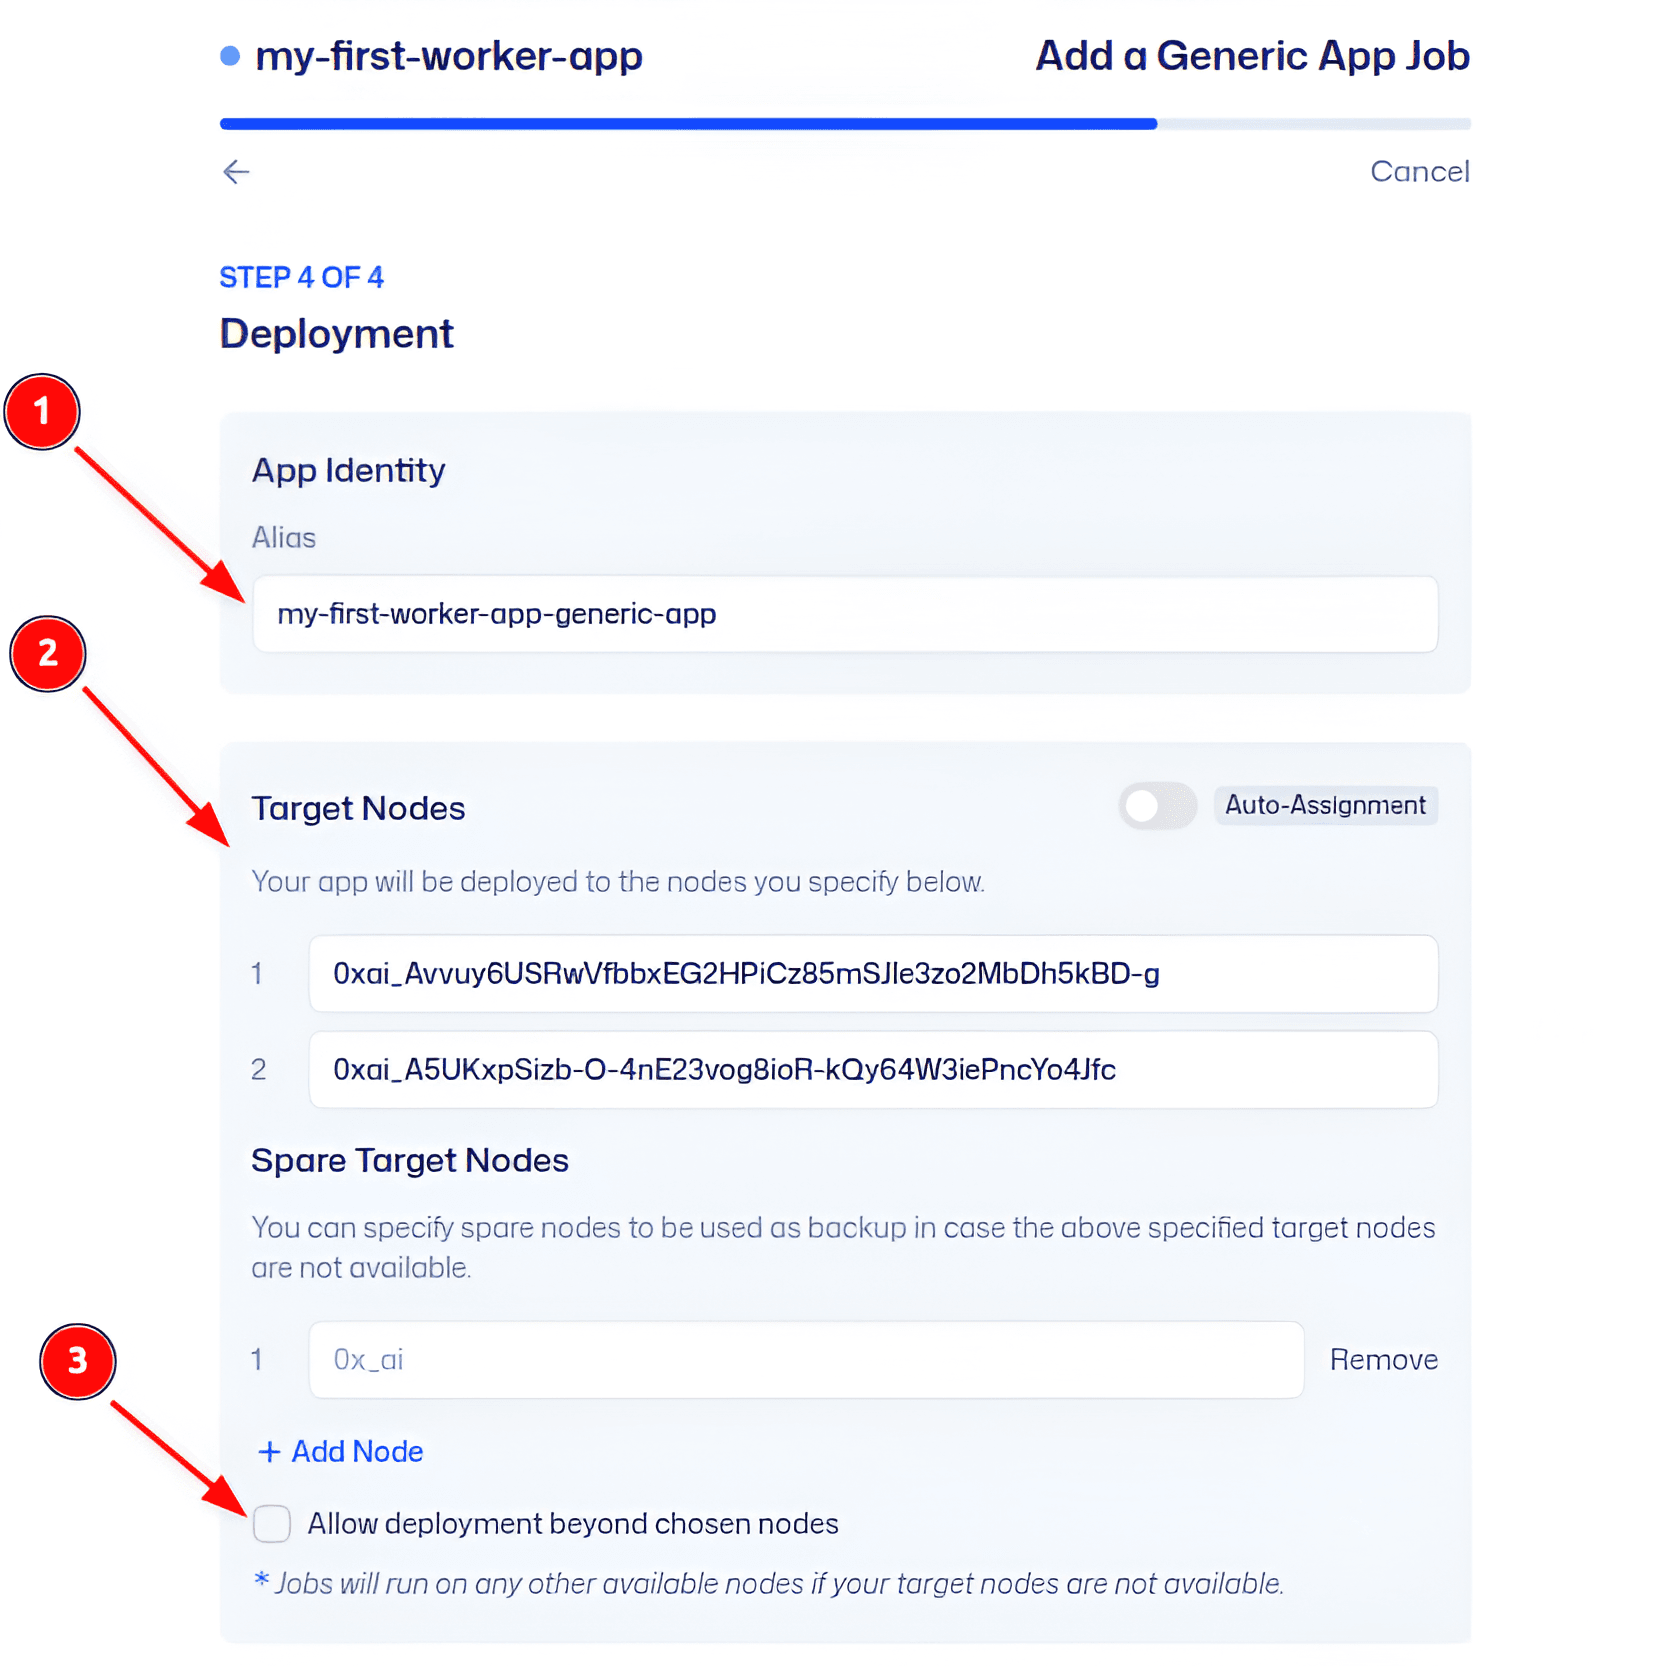
Figure 05 (Devnet): Adding a deployment alias and selecting target nodes. Now we provide a Deployment Alias and choose the target node(s). The alias is basically a nickname for this deployment (it could be the same as your project or app name, or something like “myapp-devnet-run”). This alias might be used for identifying the running job in dashboards or logs. Then, select which nodes will run the job. You can often filter nodes by attributes (Devnet might list available test nodes). In our example, we pick a specific Devnet node to host the app. (On mainnet or larger deployments, you could select multiple nodes or specific regions/tags as needed. For now, one node is fine.) Selecting the node ensures your job runs where you intend - e.g., your own node or a particular provider’s node that you trust or that meets certain compliance (KYB) labels.
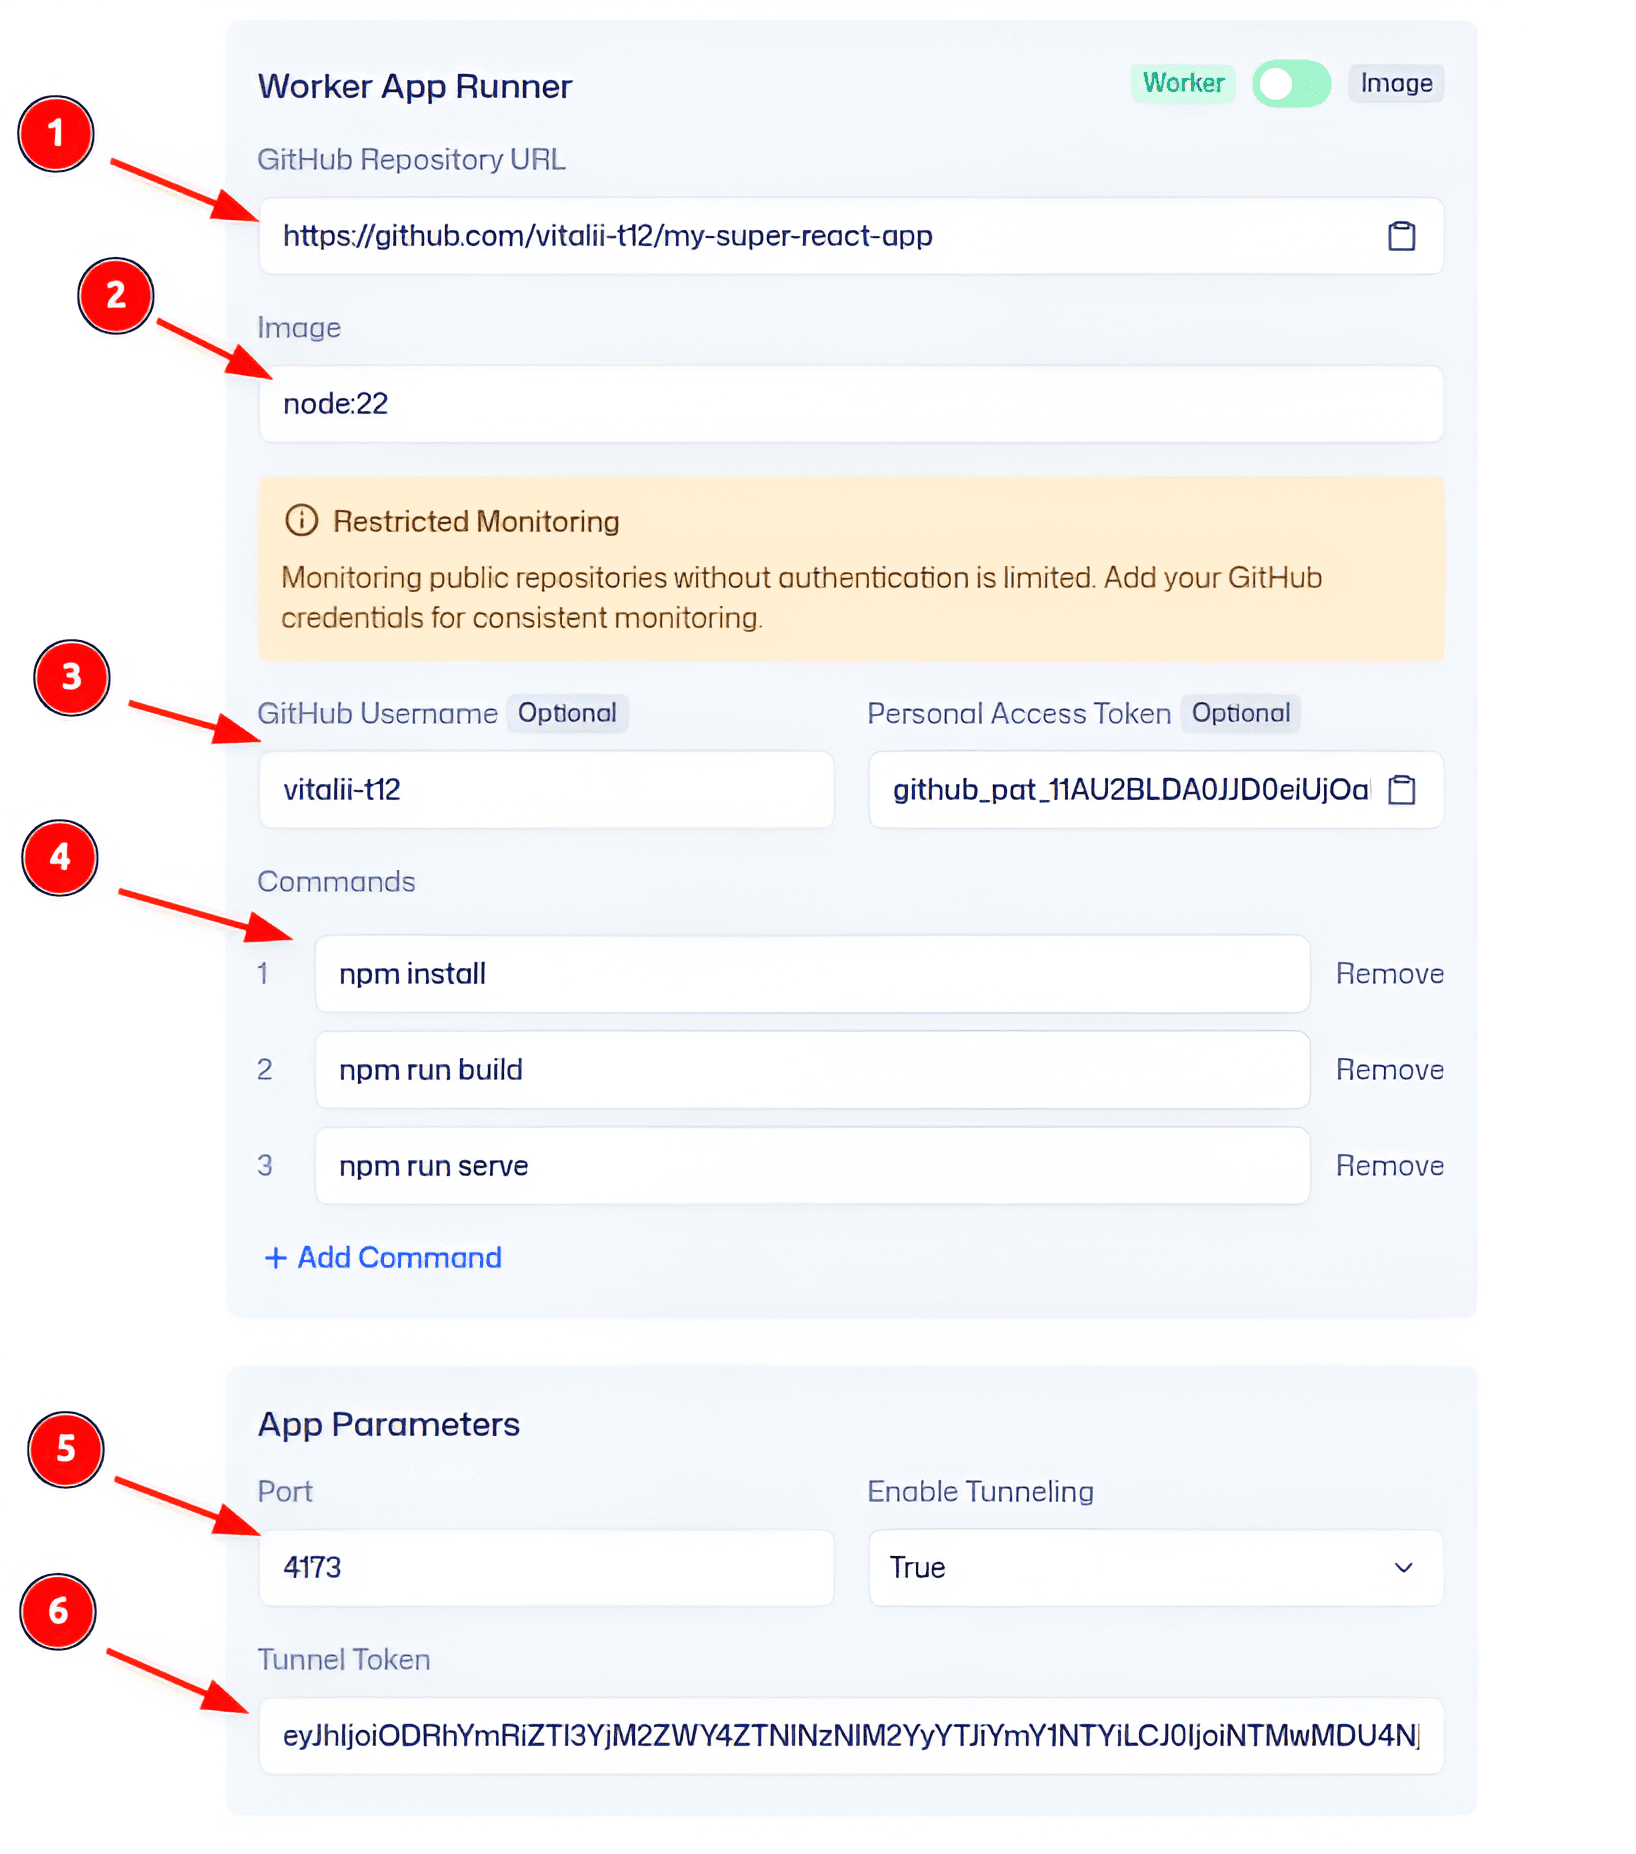
Figure 06 (Devnet): Filling in the Worker App Runner details (Git repo and commands). This is the heart of the configuration - telling the Worker App Runner what to run. Here, you’ll input: - Repository URL or Info: Provide the GitHub URL of your repository (or specify owner/repo/branch in separate fields, depending on the UI). For example, enter the link to your my-super-react-app repository on GitHub and the branch name (e.g., main). If the UI has separate fields, fill in owner, repo name, and branch accordingly.
- Build & Run Commands: List the commands the platform should execute to install dependencies and start the app. In a web form, this might be a multi-line text box or separate fields for each step. Following our example, we’d enter commands like npm install on one line, npm run build on the next, and npm run serve after that. These will be executed inside the container on the node.
- Base Image: Choose a base container image for the job’s runtime. The default might be a Node.js image (since our repo looks like a Node project). If the UI has this field, select something like node:lts-alpine or a specific version (the equivalent of "node:22" we used in the SDK). This base image provides the runtime environment needed for your app (e.g., Node.js, Python, etc.). You can typically leave it as default if it matches your app’s language.
Double-check these details, because this tells Ratio1 how to fetch and run your code. Essentially, you’re encoding what you’d normally do on a fresh machine to get your app running. Once done, continue to the next step.
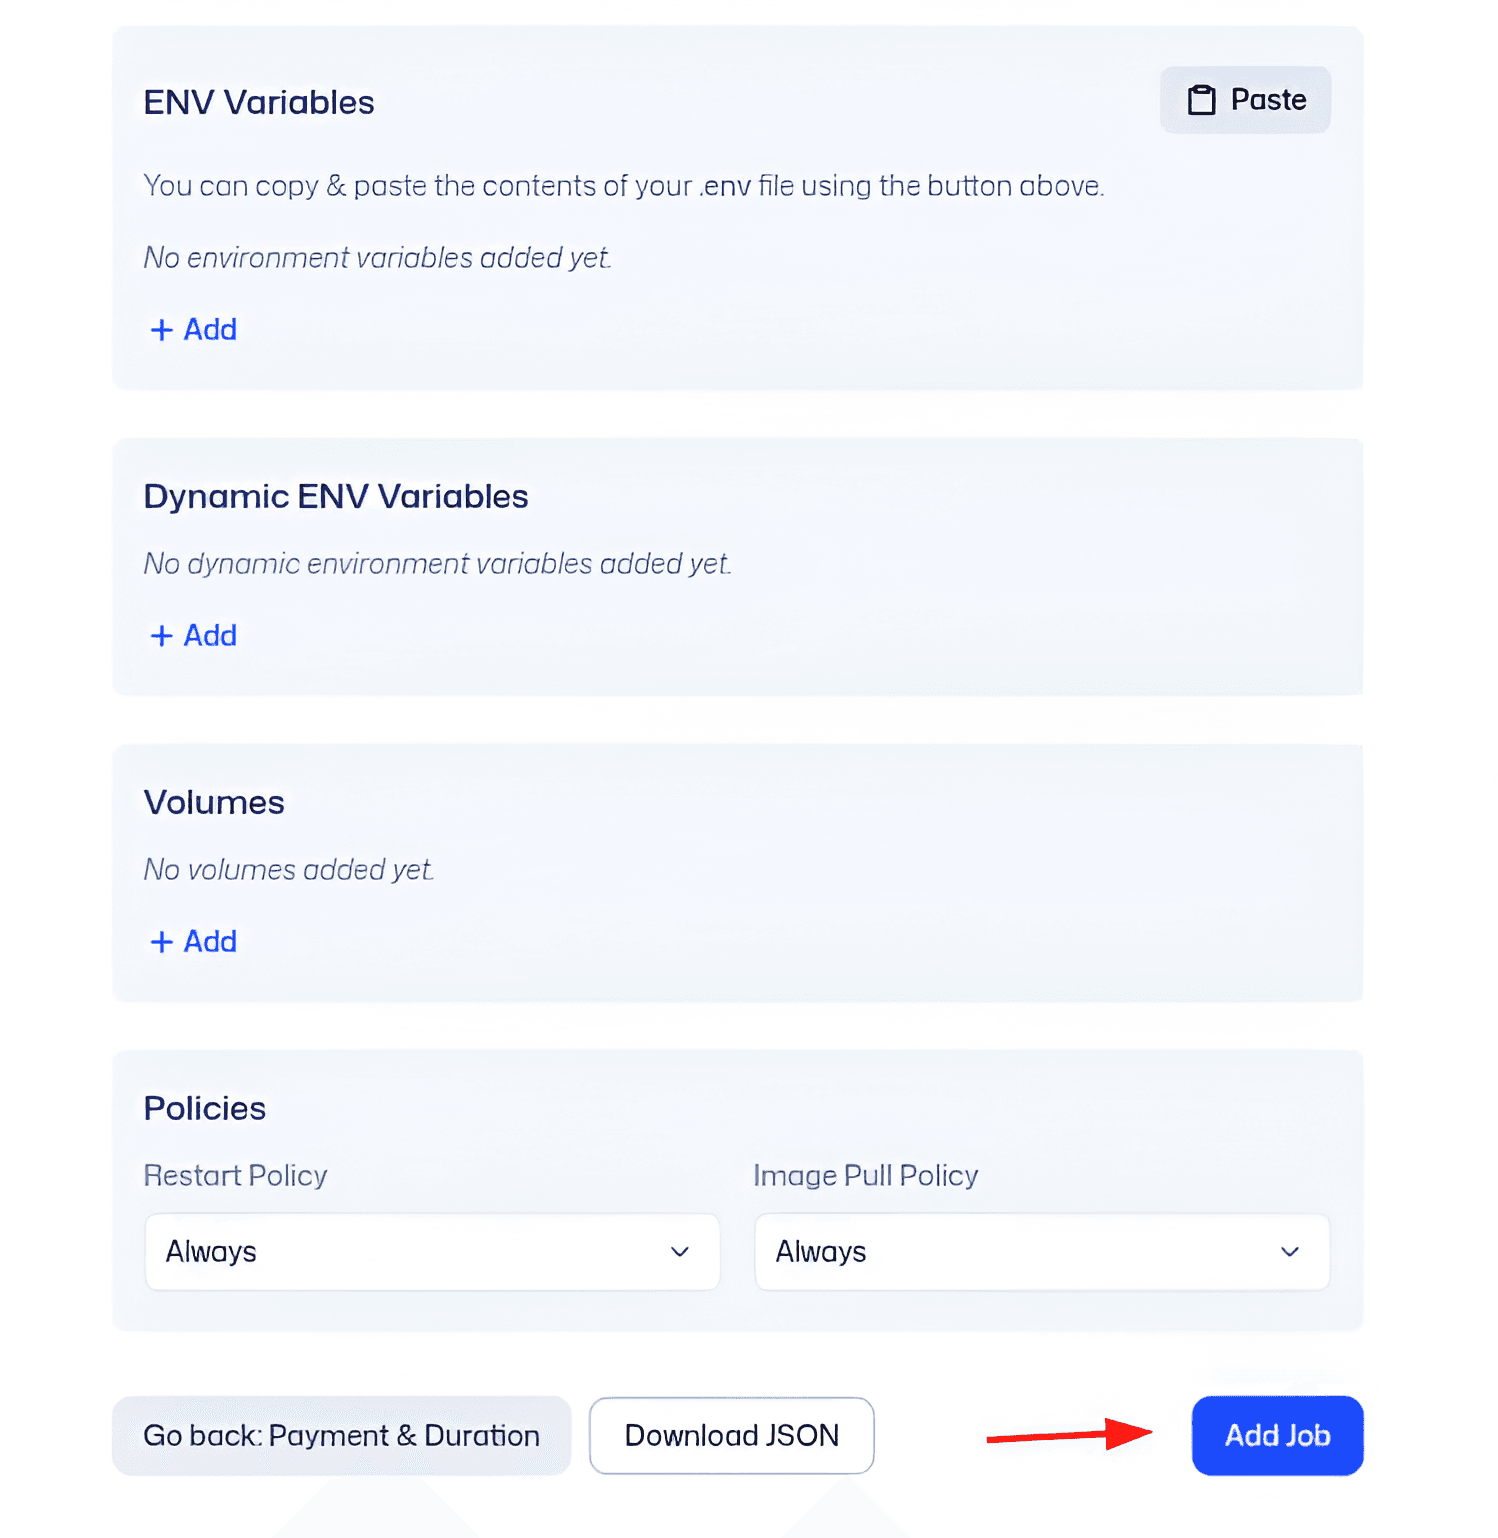
Figure 07 (Devnet): Adding environment variables, policies, and finalizing the job. In this step, you can specify any environment variables your application needs (just like we did with the SDK’s env dict). For example, you might set NODE_ENV=production or any API keys or config variables required by your app. The UI likely provides a form to add key-value pairs for env vars. Also, there may be policy settings or advanced options - for instance, you might see fields for network policies, data access policies, or other security settings. In a basic deployment, you might not need to change these, but the option is there if your scenario requires it (e.g., restricting internet access, mounting volumes, etc.). After filling these in, review all the job details you’ve entered. You’re essentially finalizing the job configuration here. Once satisfied, click the button to Finalize or Create the job (exact wording may vary). This will prepare a deployment draft for you to review before actual launch.

Figure 08 (Devnet): Project draft summary and cost breakdown. Before deploying, the Deeploy App shows a summary of the project and job you’ve configured. This includes the resource allocation, duration, selected node(s), and the cost in USDC. Figure 08 shows an example summary screen. Review this carefully to make sure everything is correct. This is your last chance to catch any mistakes (like a typo in the repo URL or commands). The summary also clearly shows how much USDC will be needed. If all looks good, you’re ready to deploy and pay for the job.
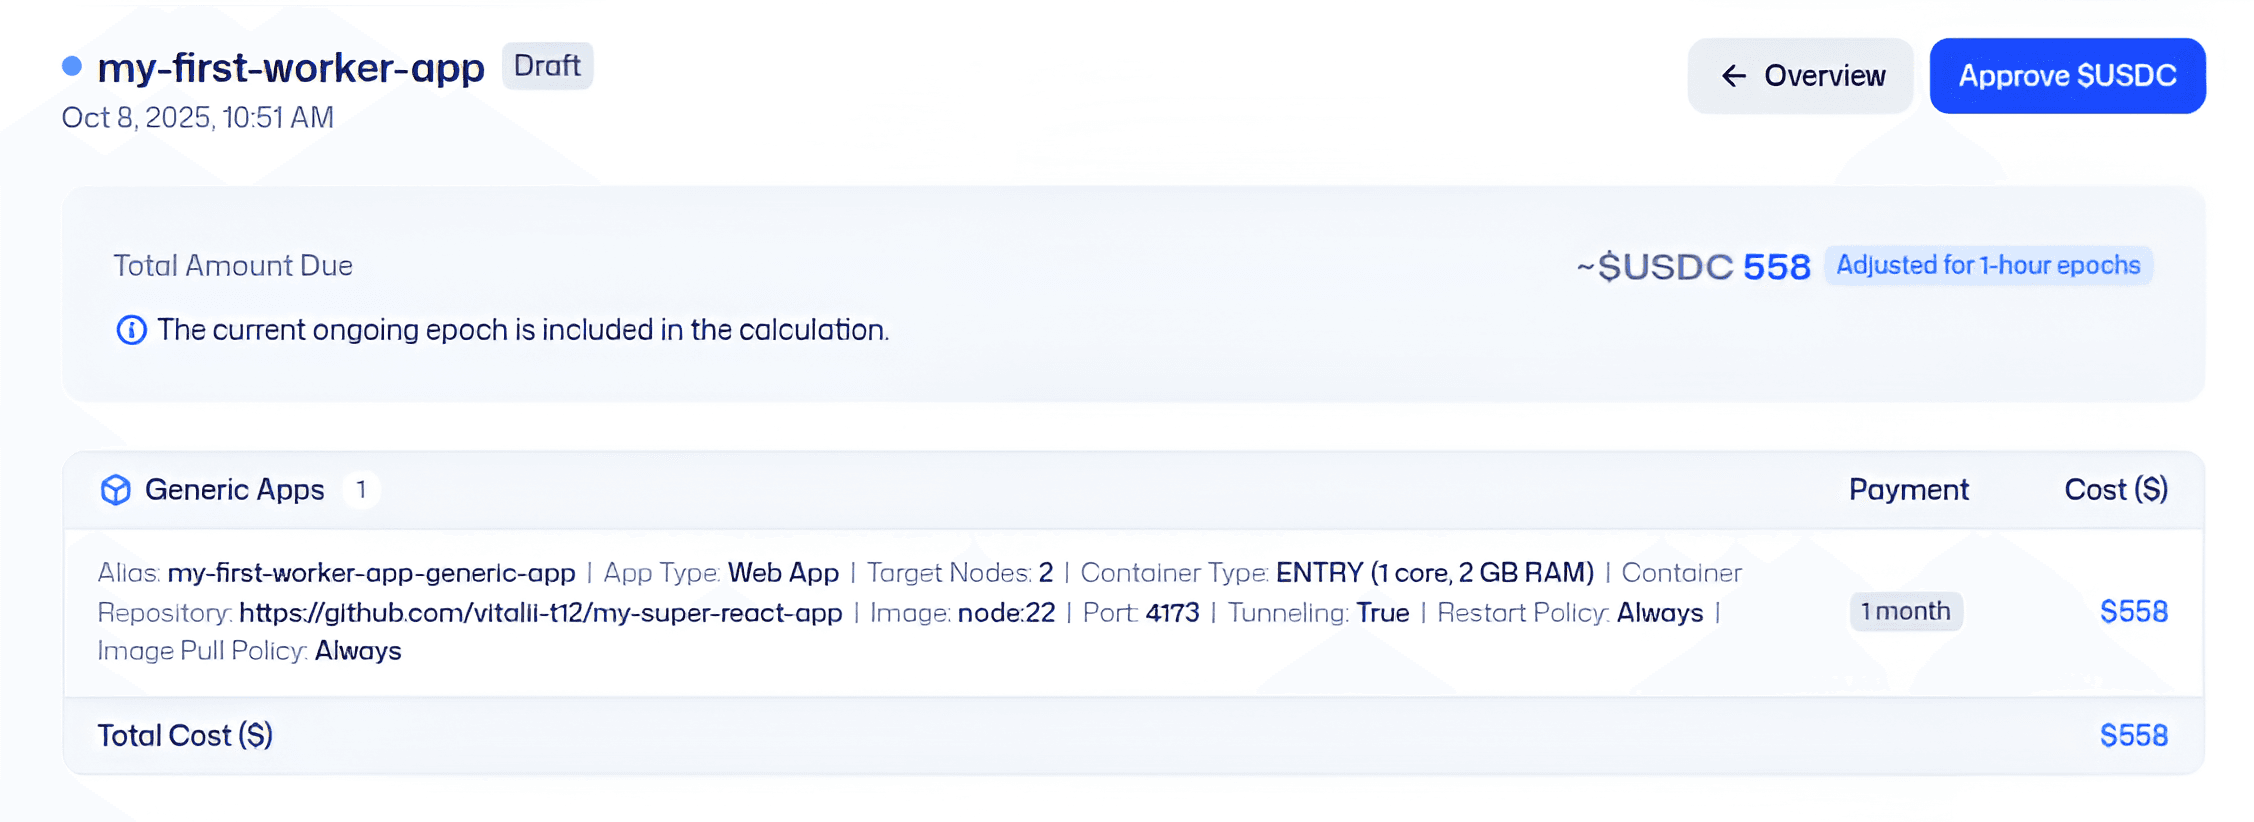
Figure 09 (Devnet): Confirming the total cost and approving USDC spend in MetaMask. Upon confirming the deployment draft, the UI will prompt you to approve the payment. Since Ratio1 uses an on-chain escrow for job payments, you need to approve the spending of USDC from your wallet to the Ratio1 escrow contract. In Figure 09, we see the “Pay & Deploy” interface reminding us of the total cost. When you click the button to proceed, your MetaMask (or connected wallet) will pop up asking for an ERC-20 approval transaction. This approval allows the smart contract to pull the specified amount of USDC from your wallet. Go ahead and approve the transaction - you might be asked to set a spending cap (usually the exact amount or a bit more). Make sure the details (token and amount) are correct, then submit the approval.
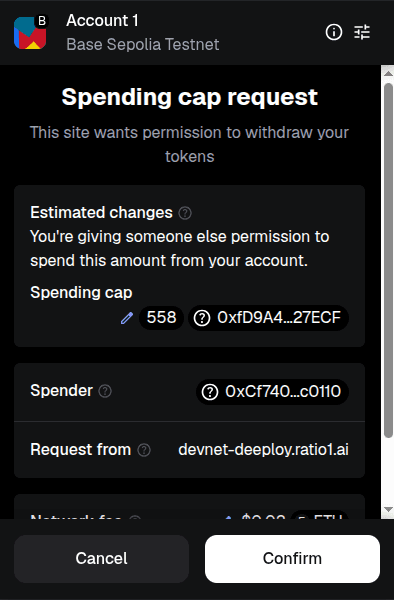
Figure 10 (Devnet): MetaMask requesting to set a spending cap for USDC. In this MetaMask dialog (Figure 10), you can see it’s asking to allow access to USDC for the Ratio1 escrow contract, up to a certain amount. This is the standard token approval step. Confirm this to let the deployment proceed. Once you approve, wait for the blockchain transaction to confirm (the UI may indicate progress).
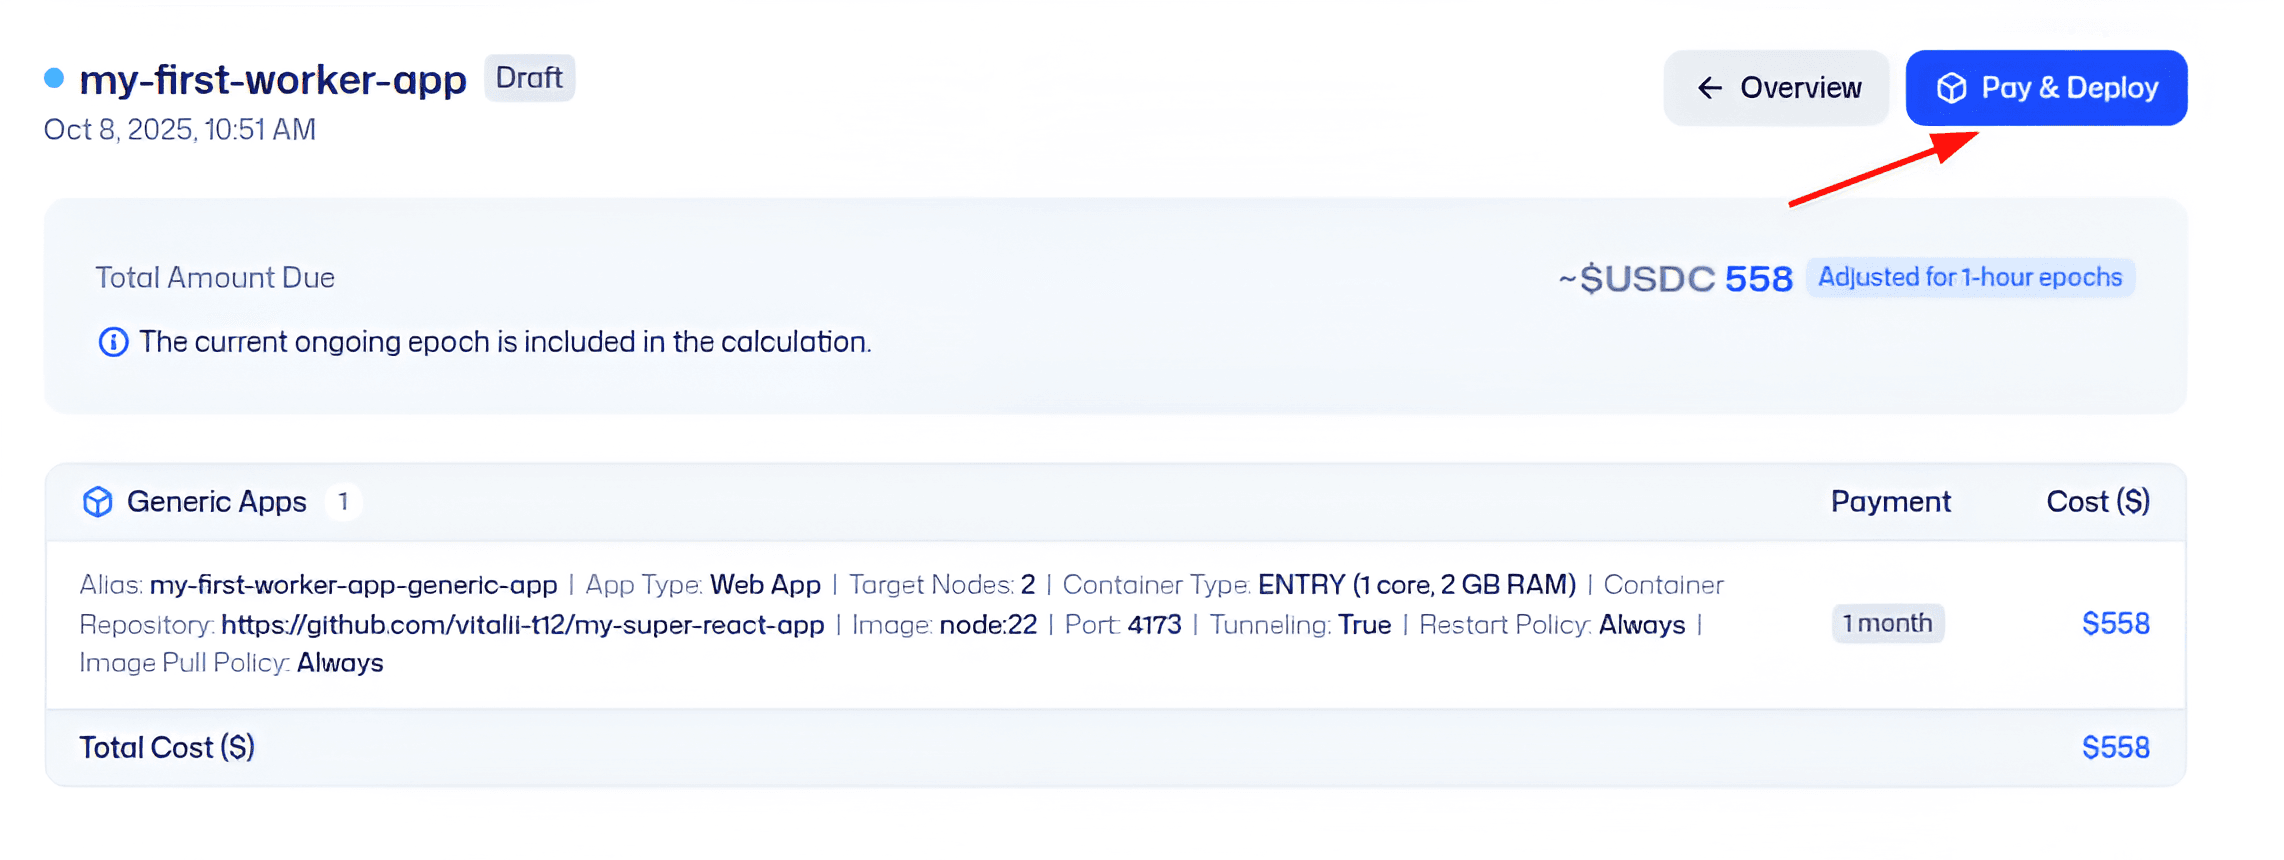
Figure 11 (Devnet): “Pay & Deploy” button becomes available after approval. After the USDC approval is confirmed on-chain, the Deeploy UI will enable a “Pay & Deploy” (or “Deploy Now”) button. Figure 11 shows the state where you can now click the final deploy button. This step will actually transfer the required USDC into the escrow and kick off the deployment on the network. Click Pay & Deploy to launch the job. The app will likely ask for one more confirmation to ensure you’re ready to deploy.
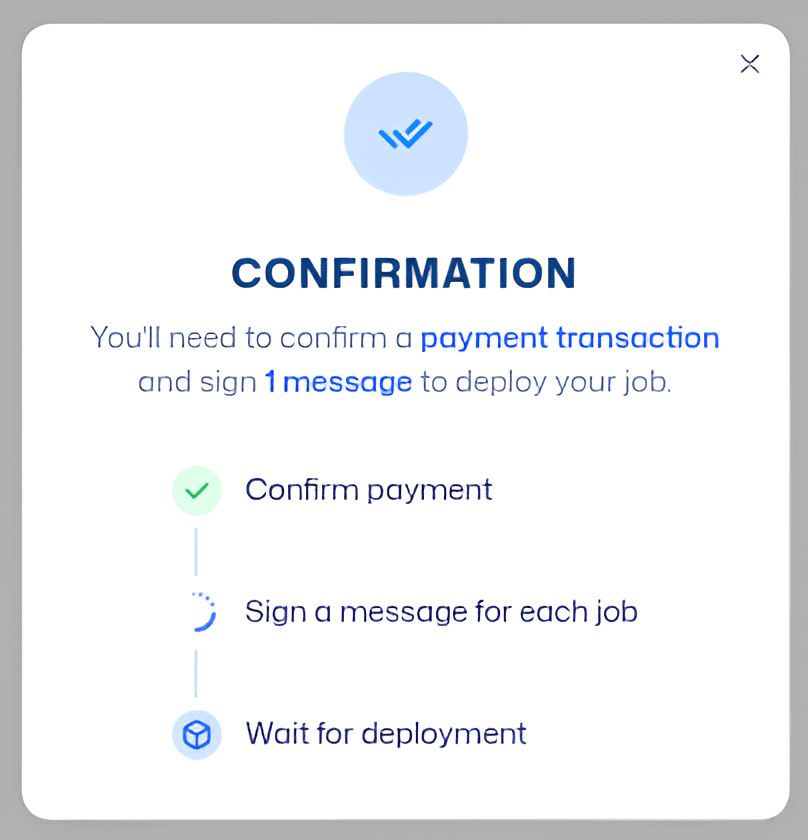
Figure 12 (Devnet): Final confirmation dialog for deploying the job. The UI might show a confirmation prompt (Figure 12) summarizing the job and asking “Are you sure you want to deploy?”. This is just a safeguard. Assuming you’re sure, confirm the deployment. Your wallet will then prompt you to sign or send the deployment transaction.
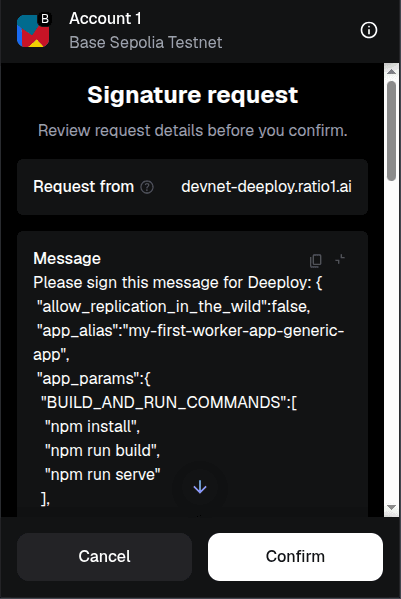
Figure 13 (Devnet): MetaMask signature request for the deployment transaction. In Figure 13, MetaMask is asking you to sign the deployment transaction. This likely involves a message signature or a direct contract call that locks your funds and signals the Ratio1 network to start the job. No additional funds are taken here (you already approved the amount); this is just the execution step. Go ahead and sign the transaction. The Deeploy app will then show a loading state as it waits for the job to be created on-chain and picked up by the target node.
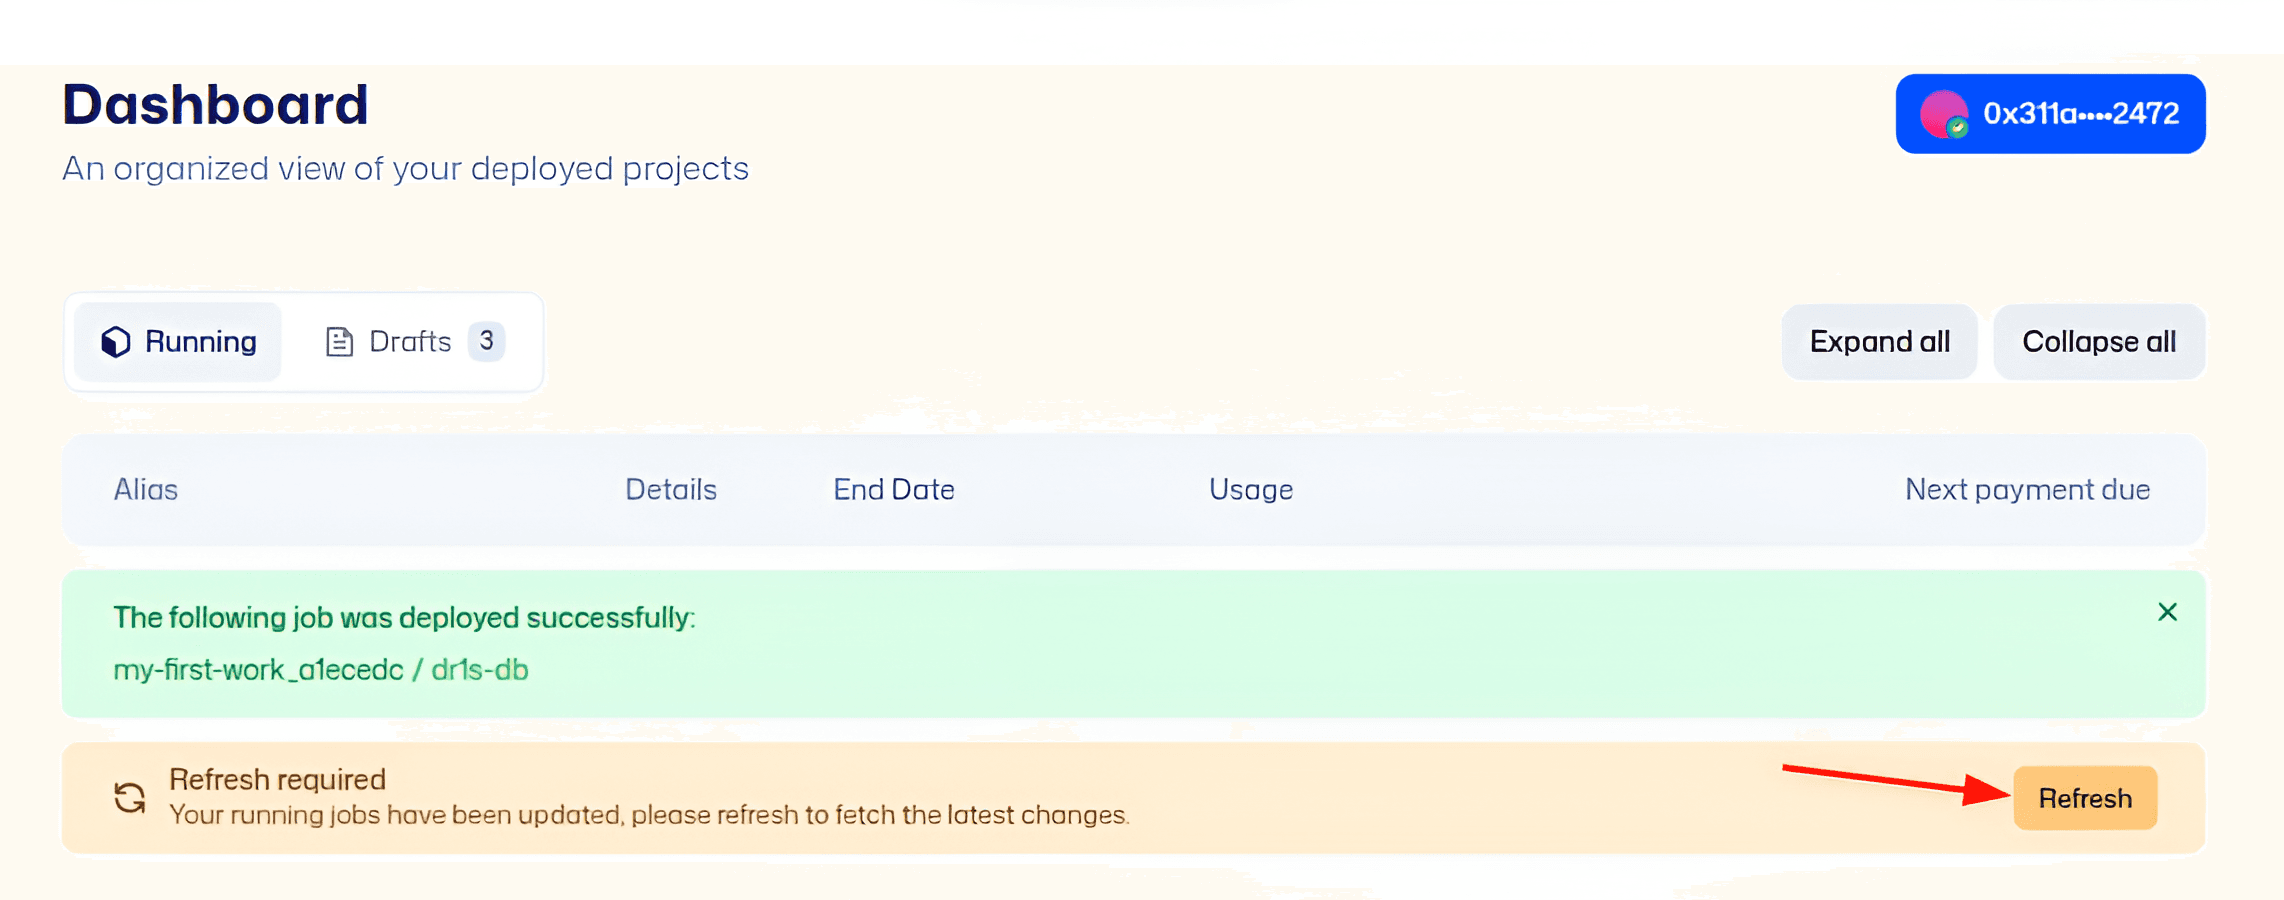
Figure 14 (Devnet): Confirmation of the message signing and job launch. After signing, you might see a “Deploying...” loader or a message like in Figure 14 indicating that the deployment is being processed. This step may take a few moments as the on-chain transaction is mined and the Oracle node initiates the job. Once done, you should receive a success notification.
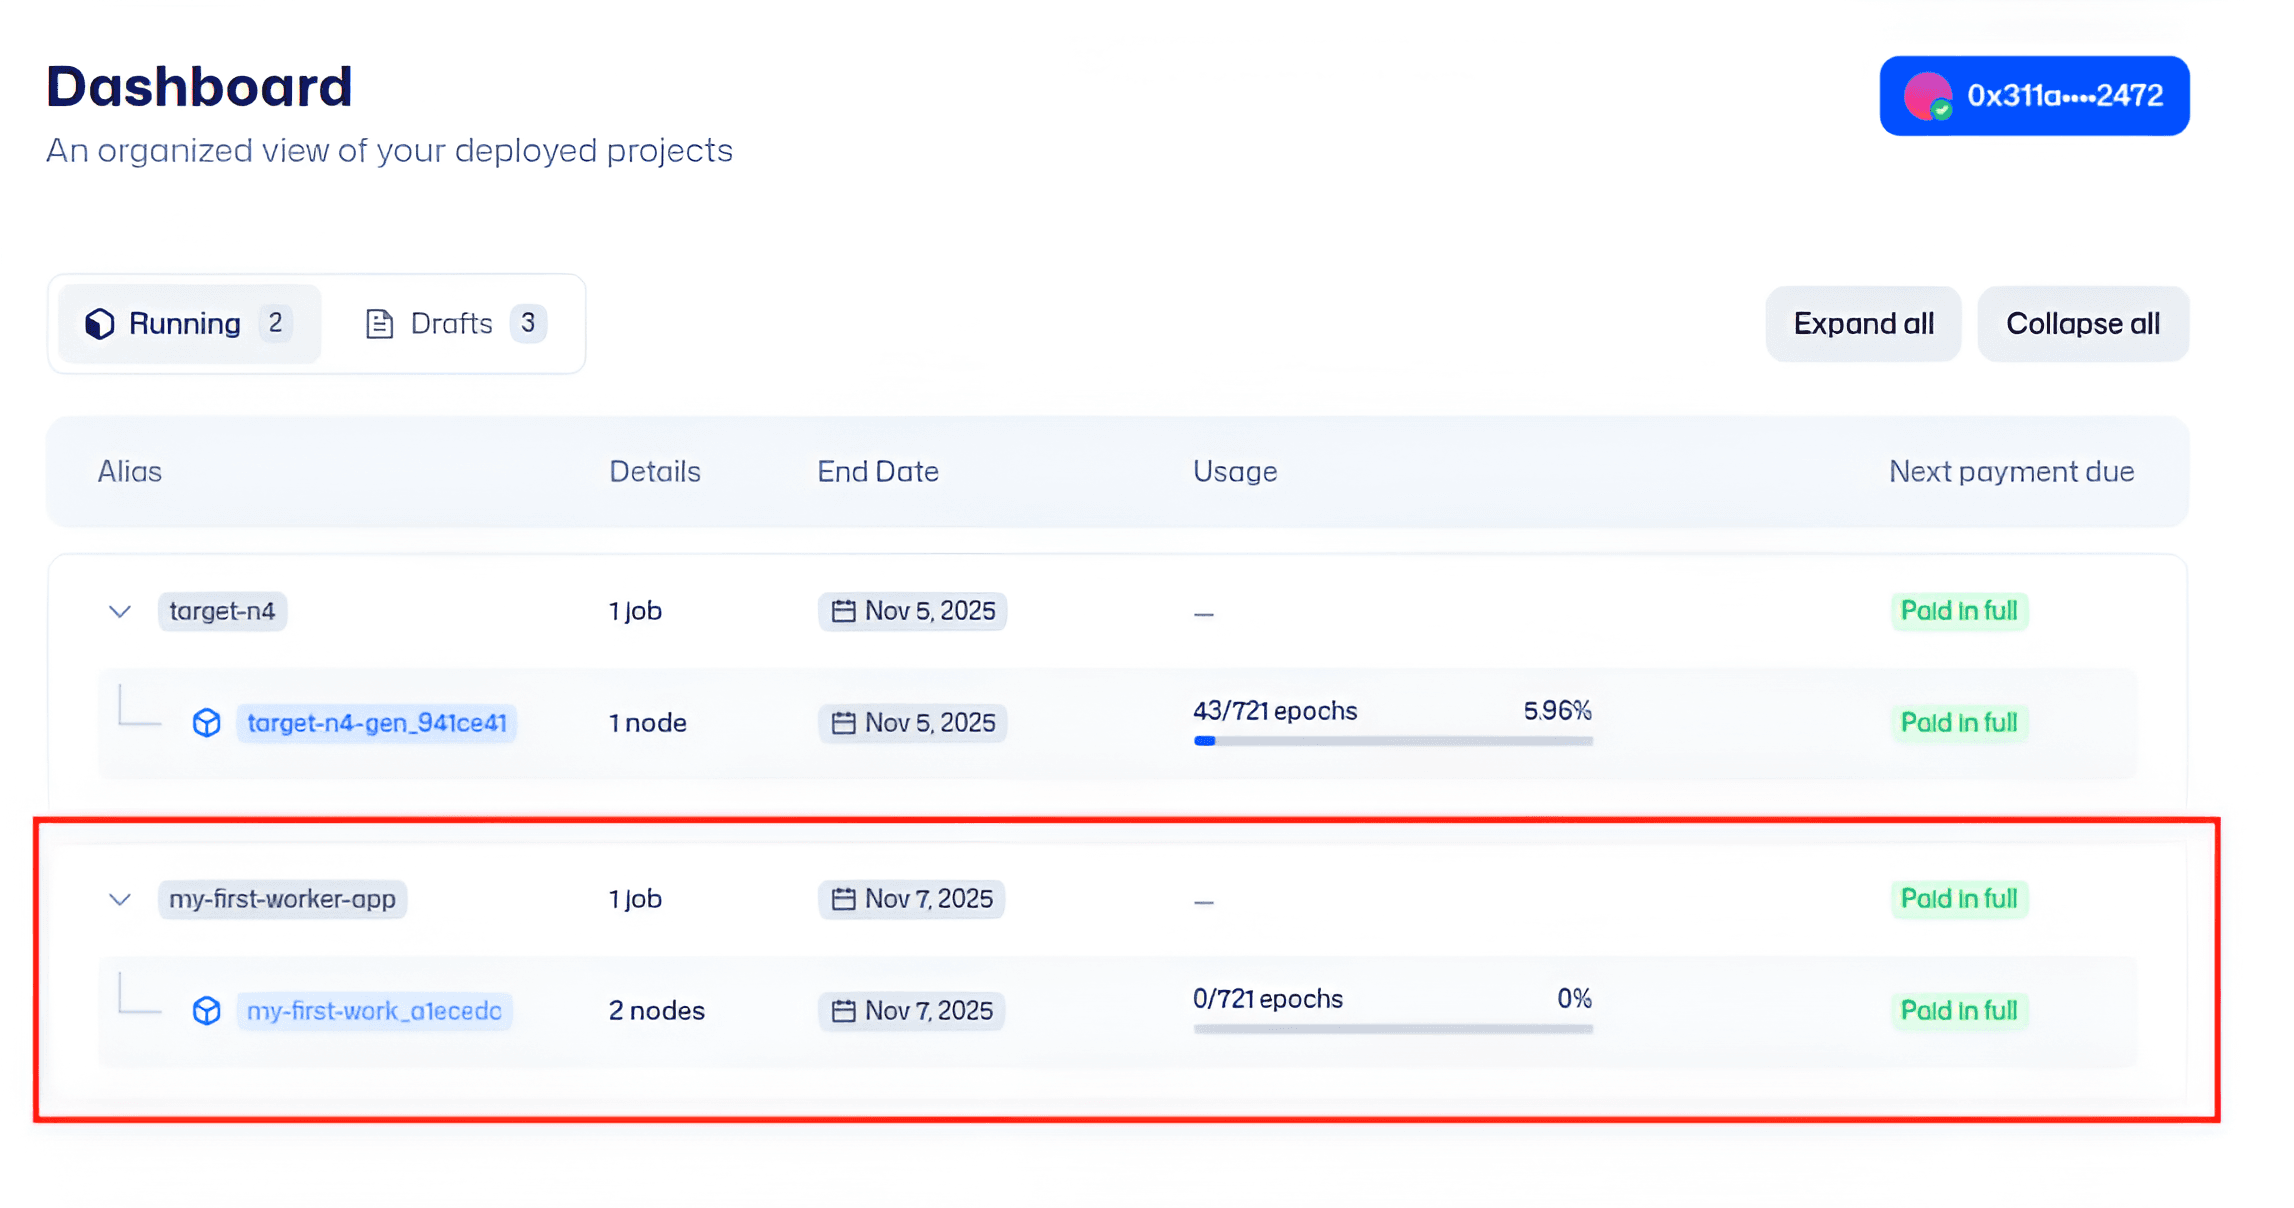
Figure 15 (Devnet): Successful deployment message in the Deeploy App. Success! The UI now shows that your job has been deployed. Figure 15 displays a message confirming the deployment (often something like “Deployment successful” or showing a job ID). At this point, your application is being launched on the selected edge node.
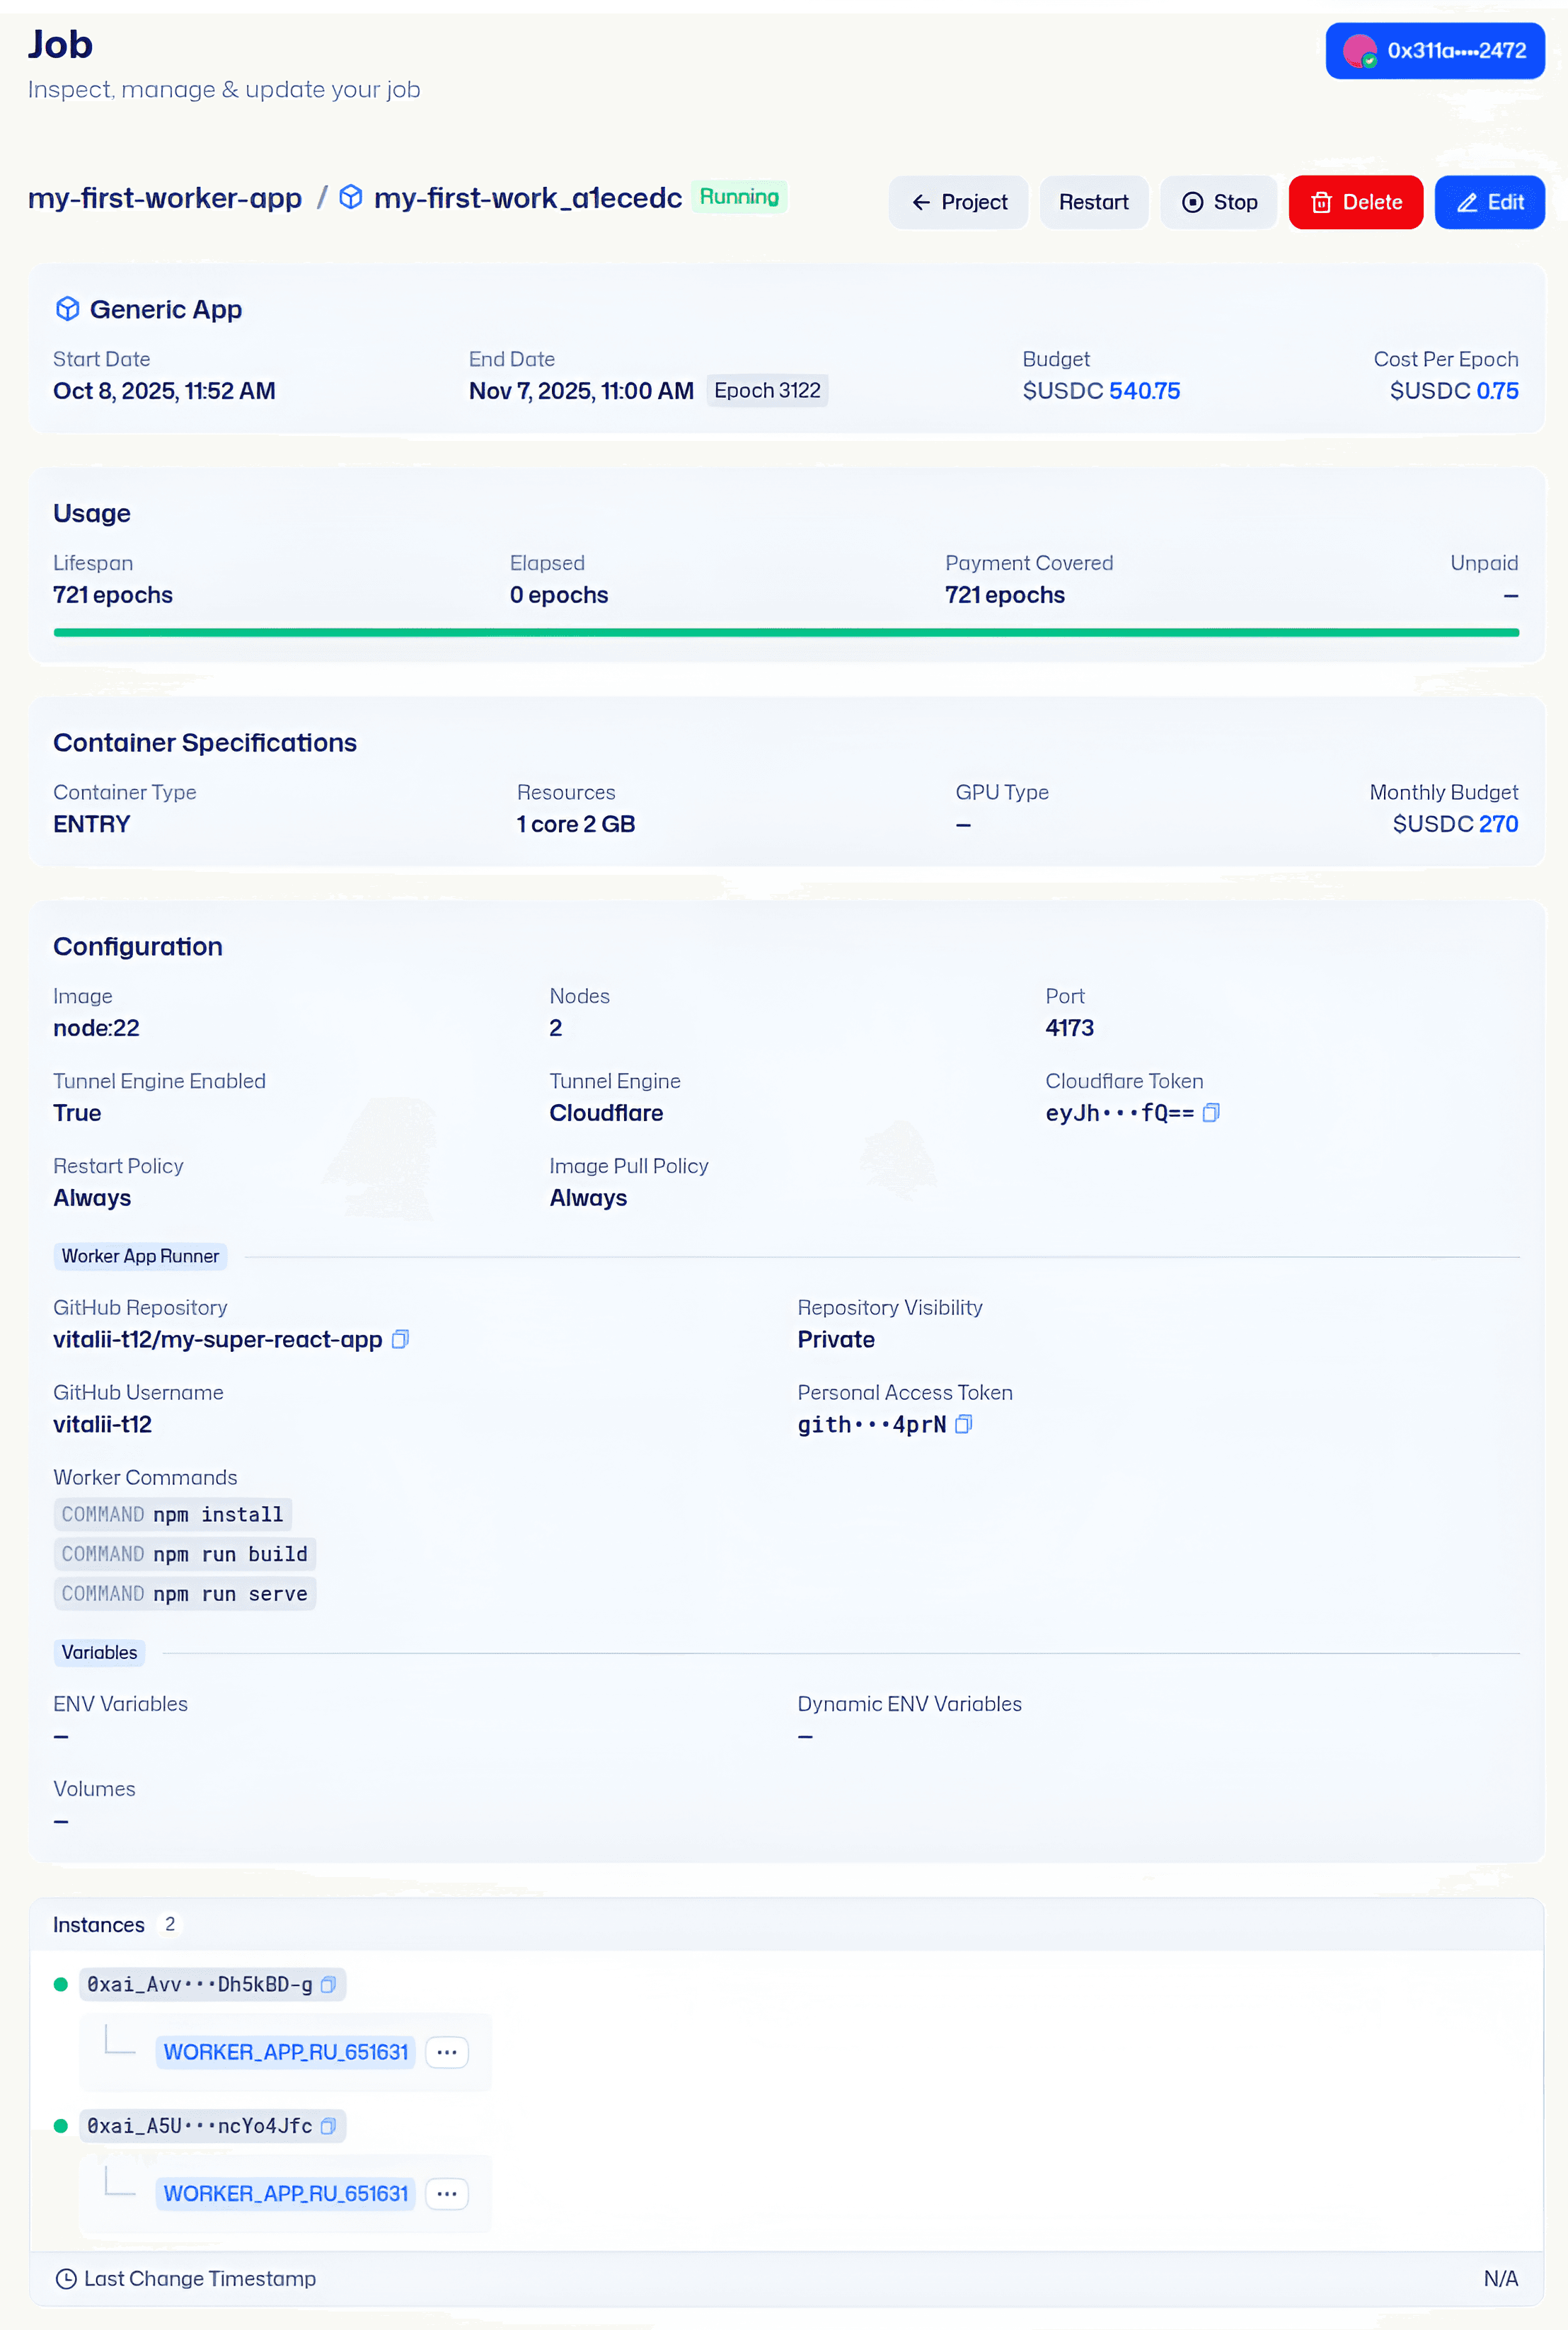
Figure 16 (Devnet): The project now shows the job in a Running state. Returning to the project dashboard, you’ll see your job listed, likely with a status indicator. In Figure 16, the project view shows the job as Running (meaning the node has successfully started the container and your app is up). You might see details like start time, the node name, and a timer for how long it will run (based on the duration you set). From here, you can click on the job to see more information or manage it.
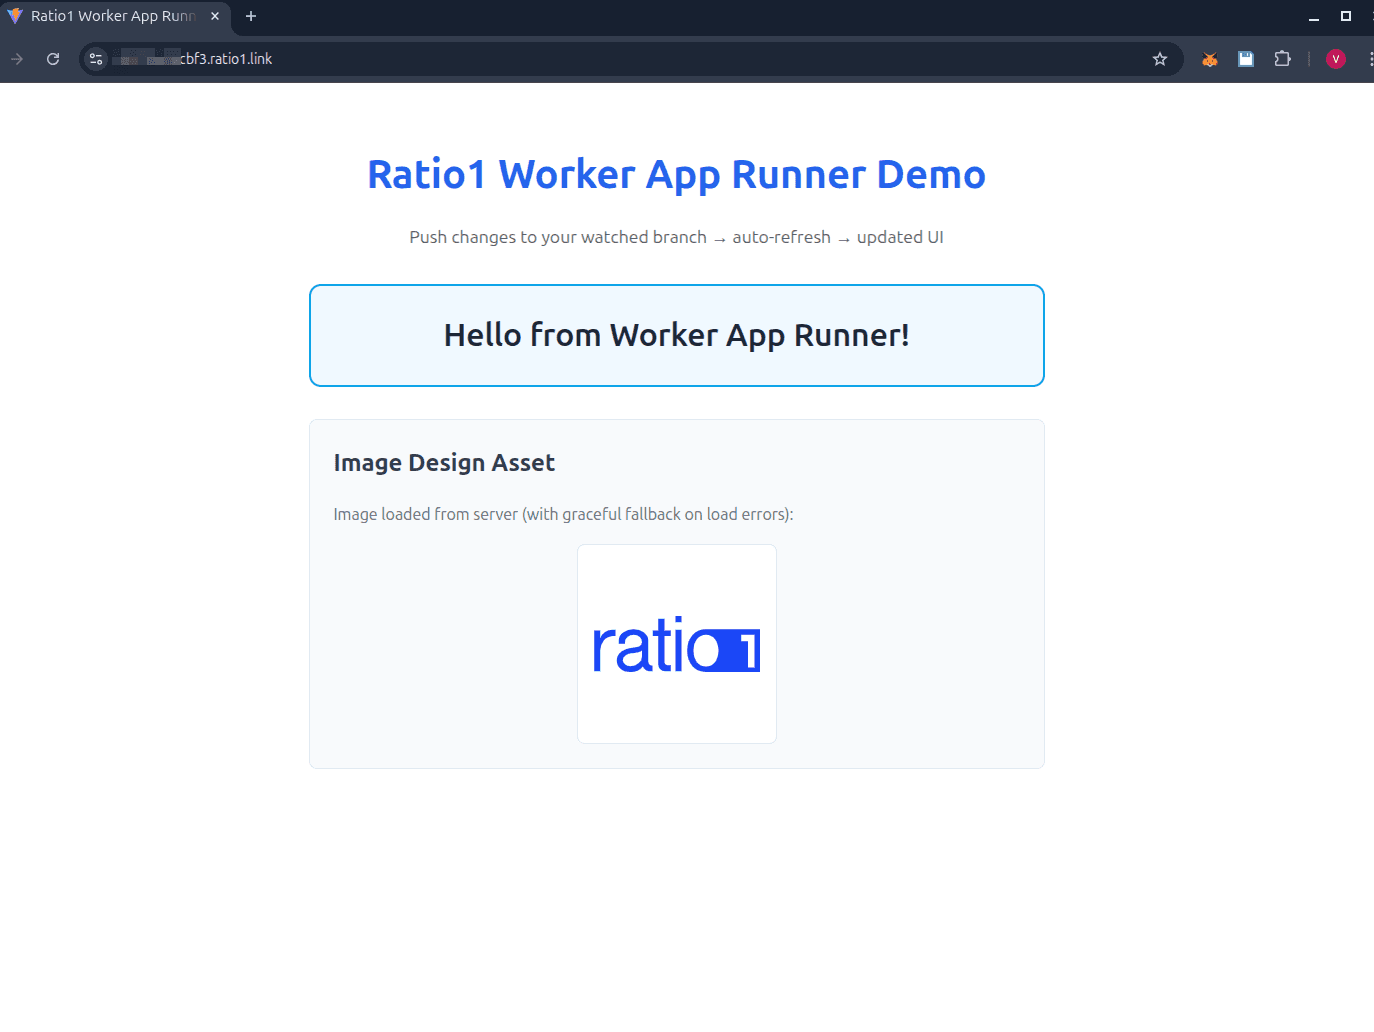
Figure 17 (Devnet): Job detail page with configuration and controls. Clicking into the job, you get a detailed view (Figure 17) of the deployment’s configuration and status. This page typically shows all the settings you provided (environment vars, repo info, etc.), logs output from your app (so you can check if the build succeeded and the app started properly), and possibly controls to stop or extend the job. It’s a good place to verify that the Worker App Runner did indeed clone your repo and run the commands. For example, you might see log lines for npm install and npm run serve. If you provided a Cloudflare tunnel, there may also be a link to your app’s URL here.
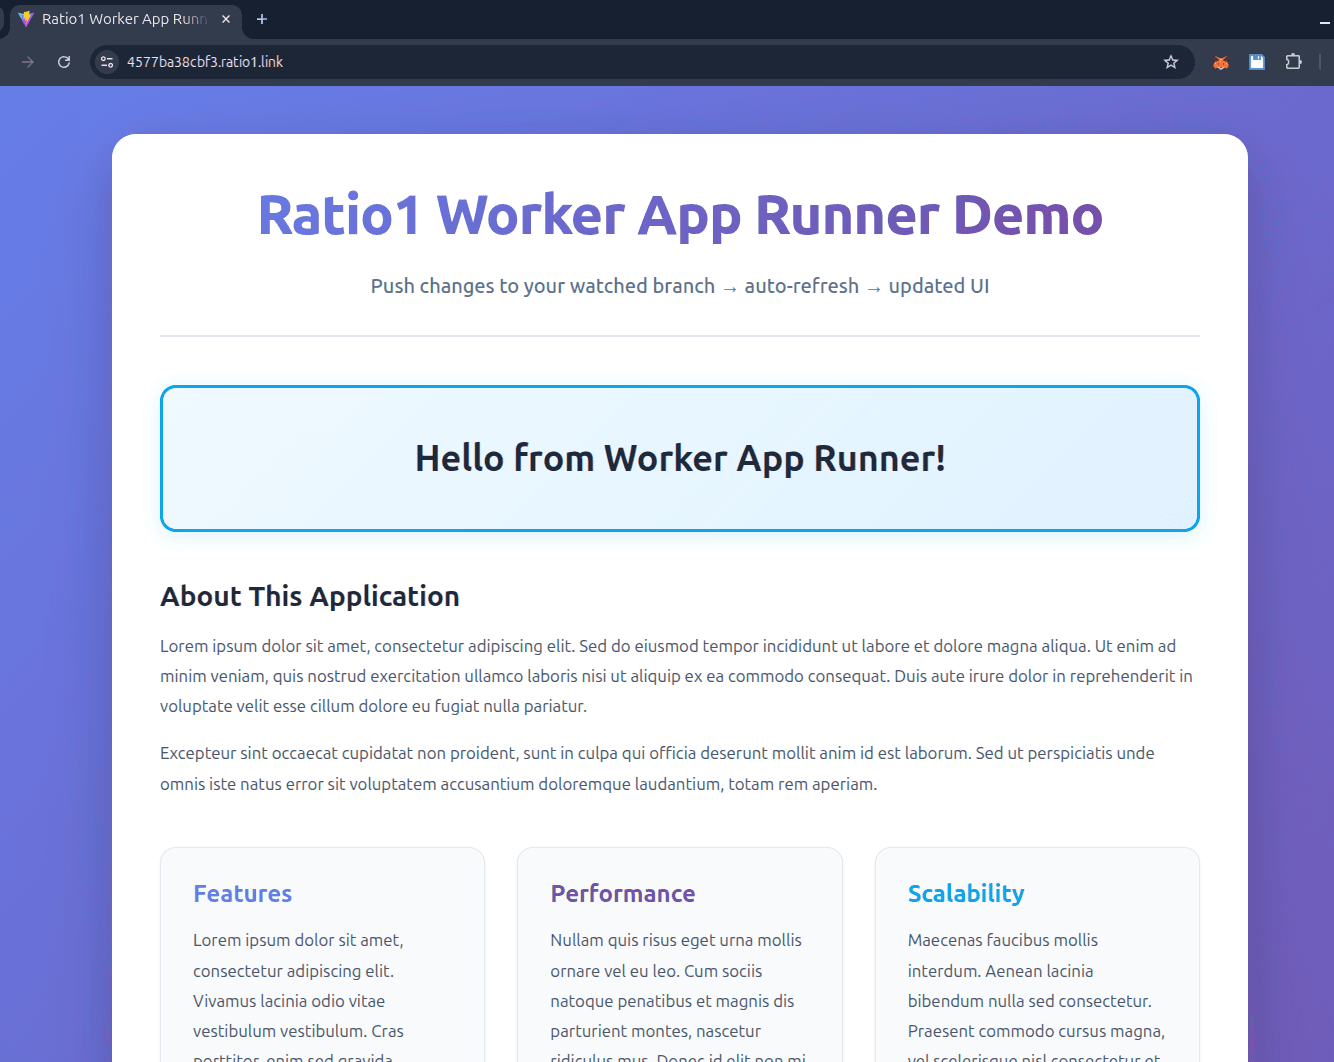
Figure 18 (Devnet): The web app is live and accessible (loaded in a browser). Now for the fun part - accessing your running application! Since we enabled a Cloudflare tunnel (via our token), the system created a public URL for our app. You can find this URL in the job details (often labeled as “Webapp URL” or similar). Open that URL in your browser, and you should see your app running live, as shown in Figure 18. In our example, it’s a React app, and the screenshot confirms the app’s UI loading correctly from the edge node. This means our code was successfully built and launched on the node, and the tunnel is working. 🎉 Take a moment to appreciate that we deployed this without writing any Dockerfiles or setting up any servers - it was all handled by Ratio1!
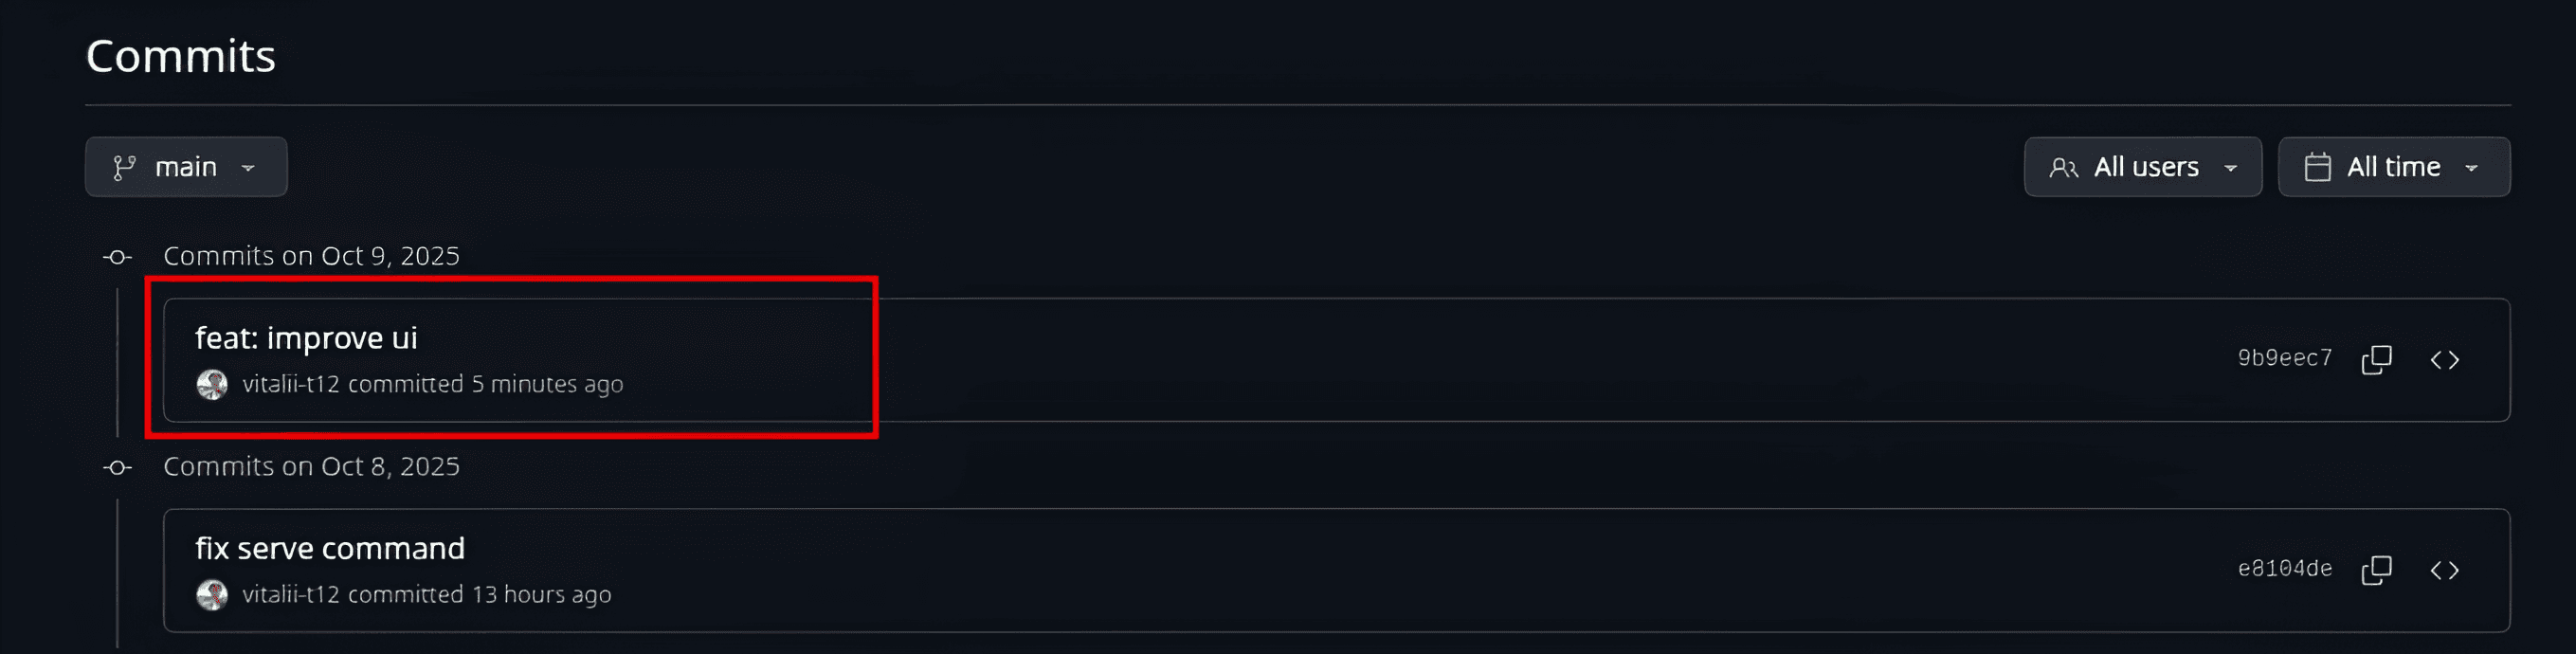
Figure 19 (Devnet): The app’s UI after pushing a new commit - changes deployed automatically. What about updates to the code? One of the coolest features of Worker App Runner is that it continuously monitors the repo. To demonstrate, we made a small change in the GitHub repository (perhaps changing some text or styling in the app) and pushed a new commit. Figure 19 shows the application’s interface updated accordingly (for instance, you might notice a new message or element in the UI). We didn’t have to reconfigure or manually redeploy anything - the system detected the commit, pulled the changes, rebuilt the app, and seamlessly restarted it inside the container. Essentially, we got a continuous deployment behavior with zero extra effort. This is the “no CI/CD” promise in action: just push your code, and the running app reflects the latest version automatically.
Figure 20 (Devnet): GitHub commit history showing the new commit that triggered the update. For verification, Figure 20 highlights the GitHub commit that we pushed. You can see the commit message (e.g., “Update homepage text”) and timestamp. This corresponds to the change that the Worker App Runner picked up. Because we set the poll interval to 60 seconds, the update was applied within about a minute of this commit. If you check the Ratio1 job logs, you’d likely see it noticing a new commit hash, then re-running the build commands. This confirms end-to-end that our deployment is connected to our source code - true continuous delivery without any external CI/CD service.
At this point, we’ve successfully deployed our application using both methods: via the SDK script and via the Deeploy web UI. You can stop the application by ending the job (through the SDK or the Deeploy interface), or let it run until the duration expires (at which time the job will stop and funds will be released if any unused). Now, let’s compare the two approaches and address some common questions.
Comparing the Two Deployment Methods
Both the SDK and the Deeploy UI ultimately achieve the same result - your app running on the Ratio1 network via the Worker App Runner - but they cater to different use cases and users. Here’s a quick comparison:
Setup & Access: The SDK method is code-driven and requires developer setup (installing the SDK, having Python environment, and node access via whitelist). It’s great for automating tasks or integrating into your development workflow. The Deeploy UI method is accessible through a web browser with your wallet; it’s more user-friendly for non-developers or CSPs managing deployments for clients. However, it requires CSP status and an Oracle node (which entails some upfront onboarding, as discussed). If you’re already a node operator or developer, SDK might feel straightforward; if you’re operating as a CSP or prefer GUIs, the Deeploy app is ideal.
Speed & Convenience: Using the SDK, you can script deployments and potentially integrate with your tooling (even trigger the script from your CI if you wanted). It’s very fast to redeploy by running a script, and you can version-control that script. The UI, on the other hand, guides you step-by-step and might be slightly slower for repeated deployments (since you click through forms). However, the UI provides a nice visual overview of resources, cost, and logs in one place. Both methods support the core feature of auto-updating from the Git repo - that’s inherent to the Worker App Runner itself, not specific to SDK or UI.
Control vs. Ease: The SDK offers more fine-grained control programmatically - you can conditionally set parameters in code, loop through different deployments, or integrate with other Python logic. It’s also easier to incorporate into larger pipelines or tests. The UI offers ease of use - anyone with access can deploy without writing code, and it ensures all steps (including payment) are handled through a clean interface. It also might enforce some best practices (for example, cost approval) so you don’t accidentally deploy something without budgeting. In short, SDK = automation & flexibility, UI = simplicity & guided experience.
Use Cases: If you’re a developer doing rapid iterations on an app or doing internal testing, the SDK method shines - you can deploy from your IDE or terminal as part of your dev cycle. If you’re a CSP deploying an app for a customer or demonstrating something in a professional setting, the UI method is polished and transparent (on-chain records, UI status updates, etc.). Also, the UI currently is the only way for a CSP to deploy on behalf of clients with escrowed payments - it ties into the CSP smart contract and billing, which the SDK (as of now) is more for direct node control by an operator.
In many cases, you might use both: develop and test with the SDK for convenience, then use the Deeploy UI to deploy production jobs in a governed, auditable way on mainnet. The good news is both methods leverage the same Worker App Runner under the hood, so your app will behave the same in either case.
Frequently Asked Questions (FAQ)
Q: Do I need to containerize my application or write a Dockerfile to use Worker App Runner?
A: No - that’s the beauty of it! With Worker App Runner, you “bring your code, not a container.” You simply provide your Git repo and let the platform handle containerization on-the-fly[14][15]. You’ll specify a base image and build/run commands (which is kind of like an in-line Dockerfile), but you do not need to pre-build or host any container image yourself. This drastically simplifies deployment, especially for quick iterations or prototypes.
Q: What kinds of applications can I deploy with this?
A: Virtually anything that can run in a container and be built with a script. Common examples include web servers, AI model inference servers, data processing jobs, APIs, etc. In our tutorial we showed a Node.js web app. You could deploy Python apps (just use a Python base image and appropriate pip install commands), Java applications (using a JDK base image), or any framework. As long as you can describe how to install dependencies and start the app, you can deploy it. Keep in mind the resources you request - e.g., if you need a GPU for AI, you can request one in the resource specs (assuming the node has a GPU available). The Worker App Runner is flexible: it’s effectively running a container that it builds for you using your instructions.
Q: How does the auto-update on commits work?
A: The Worker App Runner sets up a background process that polls the Git repository for changes (by default every 60 seconds[12]). If it detects a new commit on the branch you specified, it will automatically fetch the latest code and re-run the build and run commands. The result is that your application in the container restarts with the new code. This is similar to a CI/CD pipeline deploying a new version, but it’s happening automatically on the edge node. If you have multiple nodes (e.g., for redundancy), each node would pull the update, ensuring your app is in sync across instances. Note: If you don’t want automatic redeploys, you could set a very high poll interval or manually control updates (future versions of Ratio1 might allow triggering updates via command).
Q: What if my repository is private? Is my code secure?
A: You can deploy private repos by providing a GitHub Personal Access Token (PAT) in the vcs_data. The token will be used by the node to authenticate when cloning the repo. The token is transmitted securely to the node through the Ratio1 protocol. On the security side: your code is run on decentralized nodes, so you should treat it as you would with any cloud provider - the node operators might have the ability to see the code or output. Ratio1’s philosophy is “Your code stays yours”[16] in the sense that you’re not handing it to a centralized service permanently, and you can choose which nodes (even your own) run it. If confidentiality is a concern, you might run on permissioned nodes or wait for future enhancements like trusted execution environments. But for most use cases, it’s as secure as deploying to any server you control or trust.
Q: Can I store data or state with my application (e.g., databases, files)?
A: Yes! The Worker App Runner inherits the capabilities of Ratio1’s Container App Runner, so you can mount volumes (persistent storage) if needed. In the SDK, we saw volumes and file_volumes parameters; in the Deeploy UI, there may be options to attach storage or use existing data sources. For a database, you could deploy a separate database service and connect your Worker App to it via network or environment variables. Or use hosted databases accessible over the internet (taking care with secure connections).
Q: What network access does the app have?
A: By default, the app container will have outgoing internet access unless restricted by policy. If you enabled a tunnel (Cloudflare or ngrok), it has inbound access through that tunnel (so you get a public URL). Ratio1 uses Cloudflare Tunnels for security - your app isn’t exposed via a public IP directly, which adds a layer of protection. You can also set network policies to restrict egress if needed. Remember that if your app is a web service, you must either use the provided tunnel or handle networking differently; on Ratio1, nodes don’t just open a public port by default for jobs, it’s done via these secure tunnels.
Q: What happens when the job duration ends?
A: When the time you paid for is up (say you funded 1 month of runtime), the job will be stopped by the network. In Ratio1’s design, the escrow holds the payment and releases it to the node operator over time as the job runs. If the time runs out or you manually stop the job early, the job container is stopped. You can always extend the duration by adding more funds (through the UI, by topping up the job) if you want it to keep running continuously. If you anticipate needing it longer, deploy with a longer duration or be ready to renew. The platform may later support auto-renewal features, but currently it’s manual to prevent overspending surprises.
Conclusion
The Worker App Runner truly streamlines the deployment of applications on Ratio1. Whether you’re a hands-on developer scripting deployments with the SDK, or a CSP leveraging the convenience of the Deeploy web portal, the message is the same: go from Git to running app with minimal effort. We eliminated the usual headaches - no need to maintain CI/CD pipelines, no container registry setup, and no complex infrastructure management. Ratio1’s decentralized platform takes care of containerizing your code, provisioning resources across edge nodes, and even updating your app when you push new code. This means you can focus on writing code and iterating on features, while Ratio1 handles the “Ops” part in the background.
In our tutorial, we saw a live example of deploying a web app directly from a GitHub repo and updating it via a simple git push. Both methods achieved this with just a few minutes of setup. This level of agility, combined with the power of decentralization (you’re not locked into a single cloud provider, and you have full transparency on how and where your app runs), is what makes Ratio1’s offering special. Your application can run close to users on edge nodes, with the assurance of on-chain governance and escrowed payments for trust. And you didn’t have to set up any of that manually - it was delivered as a service by the Ratio1 network.
We encourage you to give the Worker App Runner a try on a test network. If you’re already running a Ratio1 node, fire up the SDK and deploy a sample app - you’ll be amazed how quickly it comes alive. If you’re a CSP, consider deploying a demo app through Deeploy to showcase to your clients how fast things can go from concept to reality. The more you experiment, the more you’ll see the potential: continuous deployment, A/B testing with different branches, scaling out to multiple edge locations - all without leaving your coding environment or the friendly UI.
Ratio1 is pushing the boundaries of what’s possible in decentralized DevOps, and the Worker App Runner is a prime example of that innovation. We hope this tutorial empowered you to take advantage of this tool. Happy deploying, and we can’t wait to see what you build on Ratio1!
Further Reading
Introducing the Worker App Runner: Deploy from Git to Edge - Ratio1 Blog post announcing Worker App Runner, with deep dive into why it was built and how it works[19][20]
Deeploy Unlocked: Accessing the Power of Ratio1 - Ratio1 Blog post on the Deeploy platform for CSPs, explains projects, tunnels, and on-chain deployment flow[21][22]
Ratio1 End-to-End Tutorial - Step-by-step guide on setting up a node, linking the SDK, and deploying a simple app (good for learning how to whitelist SDK and basic deployment)[18][23]
Ratio1 SDK GitHub Repository (Examples Folder) - Collection of SDK tutorial scripts, including the worker app deployment example used in this article (see ex23_deploy_worker_app.py)[24]
Decentralized Cloud Computing and Beyond - Ratio1 Blog post discussing the broader vision of Ratio1’s decentralized cloud, useful for understanding the context in which features like Deeploy and Worker App Runner operate[25][26]
[1] [2] [5] [6] [13] [14] [15] [16] [19] [20] [25] [26]
Introducing the Worker App Runner: Deploy from Git to Edgehttps://ratio1.ai/blog/introducing-the-worker-app-runner-deploy-from-git-to-edge
[3] [21] [22]
Deeploy Unlocked: Accessing the Power of Ratio1https://ratio1.ai/blog/deeploy-unlocked-accessing-the-power-of-ratio1

Vitalii Toderian
